Monday, May 30, 2016

Linux – Howto Boot an ISO from GRUB

Linux’s GRUB2 boot loader can boot Linux ISO files directly from your hard drive. Boot Linux live CDs or even install Linux on another hard drive partition without burning it to disc or booting from a USB drive.

We performed this process on Ubuntu 14.04 — Ubuntu and Ubuntu-based Linux distributions have good support for this. Other Linux distributions should work similarly.

This trick requires you have a Linux system installed on your hard drive. Your computer must be using the GRUB2 boot loader, which is a standard boot loader on most Linux systems. Sorry, you can’t boot a Linux ISO file directly from a Windows system using the Windows boot loader.

Download the ISO files you want to use and store them on your Linux partition. GRUB2 should support most Linux systems. if you want to use them in a live environment without installing them to your hard drive, be sure to download the “live CD” versions of each Linux ISO. Many Linux-based bootable utility discs should also work.


Check the Contents of the ISO File

You may need to look inside the ISO file to determine exactly where specific files are. For example, you can do this by opening the ISO file with the Archive Manager/File Roller graphical application that comes with Ubuntu and other GNOME-based desktop environments. In the Nautilus file manager, right-click the ISO file and select Open with Archive Manager.

Locate the kernel file and the initrd image. If you’re using a Ubuntu ISO file, you’ll find these files inside the casper folder — the vmlinuz file is the Linux kernel and the initrd file is the initrd image. You’ll need to know their location inside the ISO file later.

clip_image001


Determine the Hard Drive Partition’s Path

GRUB uses a different “device name” scheme than Linux does. On a Linux system, /dev/sda1 is the first partition on the first hard disk — a means the first hard disk and 1 means its first partition. In GRUB, (hd0,1) is equivalent to /dev/sda0. The 0 means the first hard disk, while the1 means the first partition on it. In other words, in a GRUB device name, the disk numbers start counting at 0 and the partition num6ers start counting at 1 — yes, it’s unnecessarily confusing. For example, (hd3,6) refers to the sixth partition on the fourth hard disk.

You can use the fdisk -l command to view this information. On Ubuntu, open a Terminal and run the following command:

sudo fdisk -l

You’ll see a list of Linux device paths, which you can convert to GRUB device names on your own. For example, below we can see the system partition is /dev/sda1 — so that’s (hd0,1) for GRUB.

clip_image002


Create the GRUB2 Boot Entry

The easiest way to add a custom boot entry is to edit the /etc/grub.d/40_custom script. This file is designed for user-added custom boot entries. After editing the file, the contents of your /etc/defaults/grub file and the /etc/grub.d/ scripts will be combined to create a /boot/grub/grub.cfg file — you shouldn’t edit this file by hand. It’s designed to be automatically generated from settings you specify in other files.

You’ll need to open the /etc/grub.d/40_custom file for editing with root privileges. On Ubuntu, you can do this by opening a Terminal window and running the following command:

sudo gedit /etc/grub.d/40_custom

Feel free to open the file in your favorite text editor. For example, you could replace “gedit” with “nano” in the command to open the file in the Nano text editor.

Unless you’ve added other custom boot entries, you should see a mostly empty file. You’ll need to add one or more ISO-booting sections to the file below the commented lines.

clip_image003

Here’s how you can boot an Ubuntu or Ubuntu-based distribution from an ISO file. We tested this with Ubuntu 14.04:

menuentry “Ubuntu 14.04 ISO” {
set isofile=”/home/name/Downloads/ubuntu-14.04.1-desktop-amd64.iso
loopback loop (hd0,1)$isofile
linux (loop)/casper/vmlinuz.efi boot=casper iso-scan/filename=${isofile} quiet splash
initrd (loop)/casper/initrd.lz
}

Customize the boot entry to contain your desiredmenu entry name, the correct path to the ISO file on your computer, and the device name of the hard disk and partition containing the ISO file. If the vmlinuz and initrd files have different names or paths, be sure to specify the correct path to those files, too.

(If you have a separate /home/ partition, omit the /home bit, like so: set isofile=”/name/Downloads/${isoname}”).

Important Note: Different Linux distributions require different boot entries with different boot options. The GRUB Live ISO Multiboot project offers a variety of menu entries for different Linux distributions. You should be able to adapt these example menu entries for the ISO file you want to boot. You can also just perform a web search for the name and release number of the Linux distribution you want to boot along with “boot from ISO in GRUB” to find more information.

clip_image004

If you want to add more ISO boot options, add additional sections to the file.

Save the file when you’re done. Return to a Terminal window and run the following command:

sudo update-grub

clip_image005

The next time you boot your computer, you’ll see the ISO boot entry and you can choose it to boot the ISO file. You may have to hold Shift while booting to see the GRUB menu.

If you see an error message or a black screen when you attempt to boot the ISO file, you misconfigured the boot entry somehow. Even if you got the ISO file path and device name right, the paths to the vmlinuz and intird files on the ISO file may not be correct or the Linux system you’re booting may require different options.

Taken From: http://www.howtogeek.com/196933/how-to-boot-linux-iso-images-directly-from-your-hard-drive/

Monday, March 28, 2016

Linux - Parted the CLI Disk Management Tool

Parted is a famous command line tool that allows you to easily manage hard disk partitions. It can help you add, delete, shrink and extend disk partitions along with the file systems located on them. Parted has gone a long way from when it first came out. Some of it’s functions have been removed, others have been added.

In this tutorial you will learn the basics of parted and we will show you some practical examples. If you don’t have any previous experience with parted, please be aware that parted writes the changes immediately to your disk, so be careful if you try to modify your disk partitions.

If you plan on testing parted, the better option would be to simply use a virtual machine or old computer/laptop without any valuable information on it. To make modifications on a disk partition it must not be in use. If you need to work on primary partition, you may boot into rescue mode.

Note: You will need to have root access to the machine you will be working on in order to use parted.


How to Install Parted on Linux

On many Linux distributions, parted comes pre-installed. If it is not included in your distro, you can install it with:

$ sudo apt-get install parted        [On Debian/Ubuntu systems]
# yum install parted                    [On RHEL/CentOS and Fedora]
# dnf install parted                      [On Fedora 22+ versions]

Once you have make sure that parted is installed, you can proceed further to check out some real world examples of parted command in the rest of this article.


1. Check Parted Version

Run the following command, you see message similar to the one shown on the image below. Don’t worry if your parted version is different. Unless specified otherwise, parted will use your primary drive, which in most cases will be/dev/sda.

$ parted

clip_image001

Check Parted Command Version

If you want to exit parted, simply type:

$ quit


2. List Linux Disk Partitions

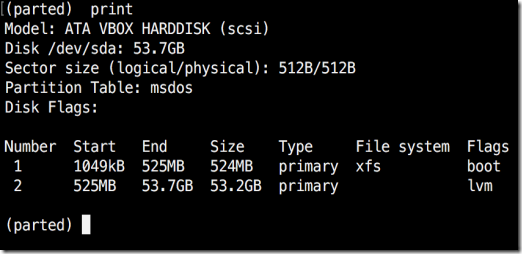
Now that parted is started, let’s list the partitions of the selected hard disk. As mentioned earlier, parted chooses your first drive by default. To see the disk partitions run print.

(parted) print

clip_image002

Check Linux Partitions

When running print, it will also display the hard disk information and model. Here is example from a real hard disk (not virtual as shown on the image above) :

(parted) print

Model: ATA TOSHIBA MQ01ACF0 (scsi)
Disk /dev/sda: 320GB
Sector size (logical/physical): 512B/4096B
Partition Table: msdos

Number  Start   End    Size   Type      File system  Flags

1      1049kB  256MB  255MB  primary   ext2         boot
2      257MB   320GB  320GB  extended
5      257MB   320GB  320GB  logical                    lvm

sector size and partition table.


3. List or Switch to Different Disk

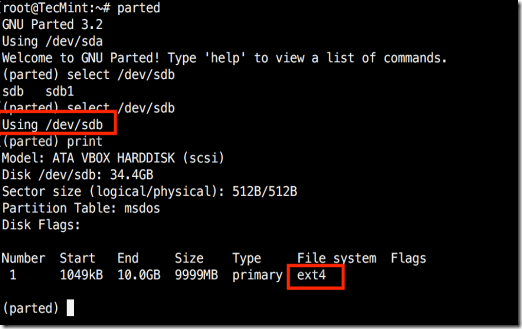
If you have more than one hard disk, you can easily switch between disks, by using the “select” command. In the example below, I will switch from /dev/sda to/dev/sdb which is a secondary drive on my system.

To easily switch between disks you can use:

(parted) select /dev/sdX

clip_image003

Select Different Disk

Change "X" with the letter of the disk to which you wish to switch.


4. Create Primary or Logical Partition in Linux

Parted can be used to create primary and logical disk partitions. In this example, I will show you how to create primary partition, but the steps are the same for logical partitions.

To create new partition, parted uses “mkpart“. You can give it additional parameters like "primary" or "logical" depending on the partition type that you wish to create.

Before you start creating partitions, it’s important to make sure that you are using (you have selected) the right disk.

Start by using print:

(parted) print

clip_image004

Show Current Linux Disk

As shown on the above image, we are using a virtual drive of 34 GB. First we will give the new disk a label and then create a partition and set a file system on it.

Now the first step is to give the new disk a label name with:

(parted) mklabel msdos

Now create the new partition with  mkpart. The listed units are in megabytes (MB). We will create a 10 GB partition starting from 1 to 10000:

(parted) mkpart

Partition type?  primary/extended? primary
File system type?  [ext2]?
Start? 1
End? 10000
(parted) print
Model: ATA VBOX HARDDISK (scsi)
Disk /dev/sdb: 34.4GB
Sector size (logical/physical): 512B/512B
Partition Table: msdos
Disk Flags:
Number  Start   End     Size    Type     File system  Flags
1      1049kB  10.0GB  9999MB  primary   ext2         lba

clip_image005

Create Primary or Logical Linux Partitions

Next,  exit parted with "quit" command. We will format our new partition in ext4 file system using mkfs. To make this happen run the following command:

# mkfs.ext4 /dev/sdb1

Note: It’s important to select the right disk and partition when executing the above command!

Now let’s verify our results, by printing the partition table on our secondary disk. Under file system column, you should see ext4 or the file system type that you have decided to use for your partition:

clip_image006

Verify Disk Partition Filesystem


5. Resize Linux Disk Partition

Parted includes multiple useful functions and one of them is "resizepart". As you have probably figured this out by now, "resizepart" helps you resize a partition.

In the example below, you will see how to resize an existing partition. For the purpose of this example, we will be using the earlier created partition.

First you will need to know the number of the partition that you will be resizing. This can be easily found by using "print":

(parted) print

clip_image007

Find Linux Partition Number

In our example, the partition number is "1". Now run the resizepart command:

(parted) resizepart

You will be asked for the number of the partition that you will resize. Enter it’s number. After that, you will be asked to set the new ending point for this partition. Remember that by default the units are in MB. In our example, we have set the new partition size to 15 GB:

(parted) resizepart
Partition number? 1
End?  [10.0GB]? 15000
Now verify the results with "print":
(parted) print

clip_image008

Verify Linux Resize Partition


6. Delete Linux Partition

The next thing you will learn is how to delete a partition from your hard drive. To do this, you will need to use the "rm" command within parted. To delete a disk partition you will need to know it’s number.

As mentioned earlier, you can easily obtain this number by using "print". In our example, we will delete the partition with number 1 from our secondary drive/dev/sdb1:

(parted) rm 1

Verify the results by printing the partitions table:

clip_image009

Delete a Linux Partition


7. Rescue Linux Disk Partition

Parted supports a “rescue" utility that helps you recover a lost partition between a starting and ending point. If a partition is found within that range, it will attempt to restore it.

Here is an example:

(parted) rescue
Start? 1
End? 15000
(parted) print
Model: Unknown (unknown)
Disk /dev/sdb1: 15.0GB
Sector size (logical/physical): 512B/512B
Partition Table: loop
Disk Flags:

Number Start End Size File system Flags
1 0.00B 15.0GB 15.0GB ext4


8 Change Linux Partition Flag

Using parted, you can change the state of a flag for disk partitions. The supported flags are:

  • boot
  • root
  • swap
  • hidden
  • raid
  • lvm
  • lba
  • legacy_boot
  • irst
  • esp
  • palo

The states can be either "on" or "off". To change a flag simply run "set"command within parted:

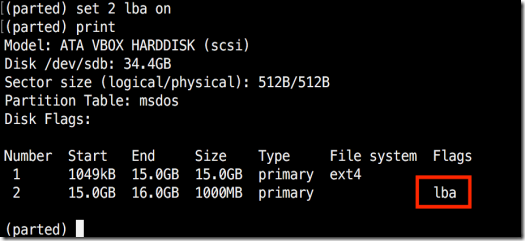
(parted) set 2 lba on

The above command sets lba flag to on for second partition. Verify the results with print:

clip_image010

Change Partition Flag


Conclusion

Parted is a useful and powerful utility that can help you manage your disk partitions in Linux systems. As always, when working with disk partitions you need to be extra careful. It is strongly recommend to go through parted man pages to learn how you can customize it’s output and find more information about its capabilities.

If you have any questions or comments, please do not hesitate to use the comment section below.


Taken From: http://www.tecmint.com/parted-command-to-create-resize-rescue-linux-disk-partitions/

Sunday, February 14, 2016

Linux - GRE Tunnel

How to create a GRE tunnel on Linux

GRE tunnels are IP-over-IP tunnels which can encapsulate IPv4/IPv6 and unicast/multicast traffic. To create a GRE tunnel on Linux, you need ip_gre kernel module, which is GRE over IPv4 tunneling driver.

So first make sure that ip_gre is loaded.

  $ sudo modprobe ip_gre
  $ lsmod | grep gre

    ip_gre 22432 0
    gre 12989 1 ip_gre

Here, we assume that you want to create a GRE tunnel between two interfaces with the following IP addresses.

    - Host A: 192.168.233.204
    - Host B: 172.168.10.25

   
On host A, run the following command.

  $ sudo ip tunnel add gre0 mode gre remote 172.168.10.25 local 192.168.233.204 ttl 255
  $ sudo ip link set gre0 up
  $ sudo ip addr add 10.10.10.1/24 dev gre0

In the above, we create a GRE-type tunnel device called gre0, and set its remote address to 172.168.10.25. Tunneling packets will be originating from 192.168.233.204 (local IP address), and their TTL field will be set to 255. The tunnel device is assigned IP address 10.10.10.1 with netmask 255.255.255.0.

Now verify that route for the GRE tunnel is set up correctly:

  $ ip route show
    default via 135.112.29.1 dev eth0 proto static
    10.10.10.0/24 dev gre0 proto kernel scope link src 10.10.10.1

On host B, run similar commands as follows.

  $ sudo ip tunnel add gre0 mode gre remote 192.168.233.204 local 172.168.10.25 ttl 255
  $ sudo ip link set gre0 up
  $ sudo ip addr add 10.10.10.2/24 dev gre0

At this point, a GRE tunnel should be established between host A and host B.

To verify that, from one tunneling end point, ping the other end point.

  $ ping 10.10.10.2 (from host A)

    PING 10.10.10.2 (10.10.10.2) 56(84) bytes of data.
    64 bytes from 10.10.10.2: icmp_req=1 ttl=64 time=0.619 ms
    64 bytes from 10.10.10.2: icmp_req=2 ttl=64 time=0.496 ms
    64 bytes from 10.10.10.2: icmp_req=3 ttl=64 time=0.587 ms

If you want to tear down the GRE tunnel, run the following command from either end.

  $ sudo ip link set gre0 down
  $ sudo ip tunnel del gre0

Taken From: http://ask.xmodulo.com/create-gre-tunnel-linux.html

Thursday, January 21, 2016

Ubuntu - Installation on UEFI / GPT Systems

Installation of Ubuntu 15.04 (Vivid Vervet) Desktop on UEFI Firmware Systems

by Matei Cezar | Published: April 25, 2015 | Last Updated: October 23, 2015

Ubuntu 15.04 , codename Vivid Vervet , non-LTS , has finally been released for Desktops, Servers, Cloud and other instances and flavours. This version comes with nine months support and some interesting changes, the most notable ones being the replacement of Upstart init service with Systemd service, Linux 3.19 Kernel, MariaDB 10.0, LXC 1.1 and LXD 0.17.

Update: Ubuntu 15.10 Released – Install Ubuntu 15.10 Desktop

clip_image002

Ubuntu 15.04 Installation On UEFI Systems

This article will guide you on how you can install Ubuntu 15.04 , single boot, on UEFI Firmware machines with a manual default partition layout in order to preserve free space for future Operating System installations in dual-boot.

Be aware that all system installations made from UEFI booting sequence assumes that your hard drive will be partitioned in GPT style, regardless of the size of your disks. Also, try do disable Secure Boot and Fast Boot options from UEFI settings (if supported), especially if you are trying to boot from a USB UEFI compatible bootbale drive made with Rufus utility.


Requirements

Download Ubuntu 15.04 ISO image, which can be obtained from the following link:

http://releases.ubuntu.com/15.04/


Ubuntu 15.04 Desktop Installation Guide

The installation of Ubuntu 15.04 it pretty simple and straightforward as its previous releases. However, if you are booting and installing the system on a UEFI Firmware machine, besides the classical partitions you need to assure that you create a standard EFI partition required for the boot loader to pass the further instructions to Linux Grub.

1. The first step you need to take in order to install Ubuntu 15.04 is to burn an Ubuntu ISO image or create a compatible UEFI USB drive, place the bootable media into your appropriate drive, then enter UEFI settings and disable Secure Boot and Fast Boot options and instruct your machine to restart in UEFI with the appropriate bootable CD/USB drive.

2. After the machine boots the media, the Grub screen should appear on your screen. From here choose Install Ubuntu and press Enter key to continue.

clip_image004

Booting Screen

clip_image006

Ubuntu Grub Menu

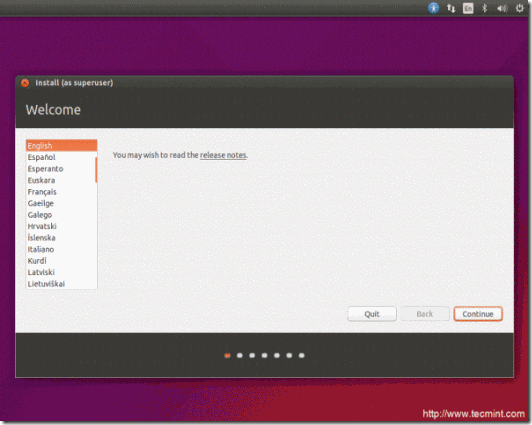
3. On the next step, choose the Language for your system and press Continue button to move forward.

clip_image008

Select Install Language

4. Next, the installer checks if your system has Internet connectivity and inspects your hard drive required space. After all the requirements are met, just press Continue button again to proceed further. The installation can continue without an Internet connection also.

clip_image010

Preparing to Install Ubuntu

5. On the next step you must choose an Installation type. To ensure that Ubuntu doesn’t eat all your hard disk space while installing the system using the first option, Erase disk and Install Ubuntu , choose the last option with Something else and hit Continue button.

This option is the most safest and flexible in case you might want to preserve some disk space and install other Operating Systems in dual-boot after you install Ubuntu.

clip_image012

Select Installation Type

6. On this step you must create a Partition Table in case you have a blank drive and slice-up your disk. Select your hard-disk in case your machine has more than one disks, hit New Partition Table button and Continue button from the pop-up warning in order to create the GPT partition table.

clip_image014

Select Partition

clip_image016

Partition Confirmation

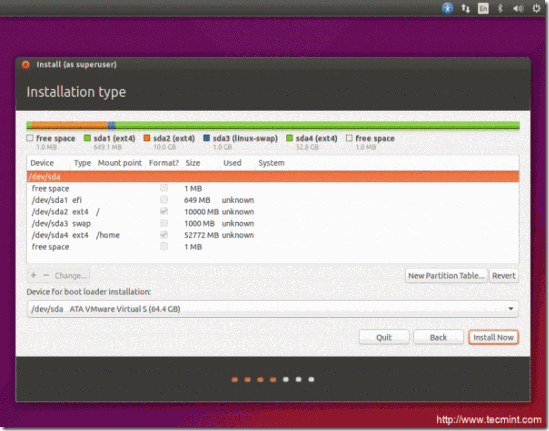
7. Now it’s time to create the system partitions manually. The partition table will have the following scheme:

  • EFI System Partition – 650 MB
  • Mount Point /(root) Partition – min 10 GB – Formatted EXT4 journaling file system.
  • Swap Partition – min 1GB (or double RAM size).
  • Mount Point /home Partition – custom space (or all remaining space) – Formatted EXT4 journaling file system.

All partitions should be Primary and At the beginning of this space.

To begin, select free space and hit the Plus + button to create the first partition. This first partition will be the EFI standard partition. Enter 650 MB as its size and choose Use as EFI System Partition , then OK button to confirm and create the partition.

clip_image018

Create EFI System Partition

clip_image020

Enter EFI Partition Size

8. Next, chose free space again, hit the + button and create the /(root) partition. Make sure the partition has at least 10GB of space and will be formatted as EXT4 journaling file system.

clip_image022

Create Root Partition

9. Next, using the same steps as for previous partitions, create a swap partition with minimum 1 GB . The recommendations are to use double size of your RAM , but 1GB is enough for new machines with a lot of RAM (actually the swapping slows down your machine considerably on non-SSD hard drives).

clip_image024

Create Swap Partition

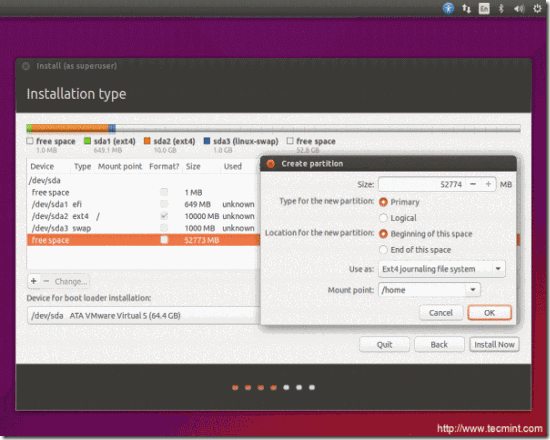
10. The final partition that you need to make it should be the /home partition. So, select free space again, hit + button and enter the desired size for mount point /home partition. Use EXT4 journaling file system and press OK to create the partition.

clip_image026

Create Home Partition

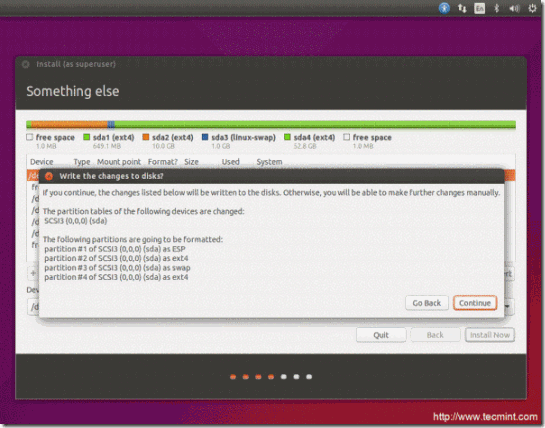
11. After all the partitions are created hit the Install Now button to begin the installation process and confirm the hard disk changes by hitting the Continue button from the pop-up warning. In case a new warning window appears with Force UEFI Installation, hit both Continue buttons again as illustrated on the below screenshots.

clip_image028

Partition Table: Install Now

clip_image030

Confirm Partition Changes

clip_image031

Force UEFI Installation

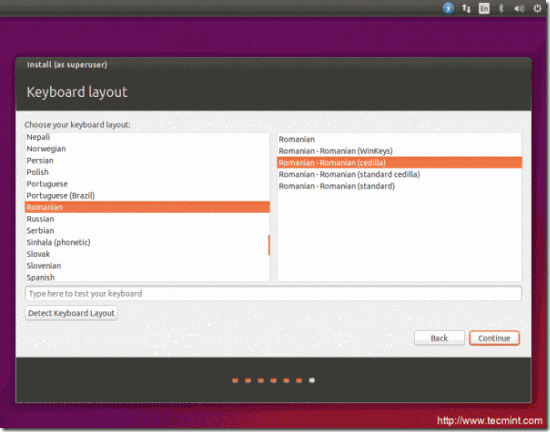
12. After the installation process starts, choose your system Keyboard layout and hit Continue to move on the next step.

clip_image033

Select Keyboard Layout

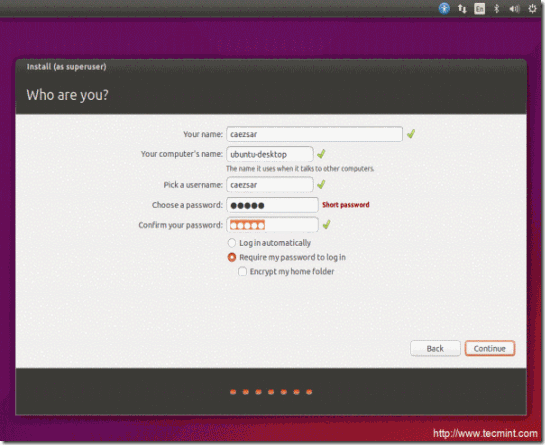
13. On the final step regarding your system configurations, enter the name for the system administrative user with root privileges, type a name for your computer and choose a password to protect the admin user. Select Require my password to log in and hit Continue to finish the system configuration. After this step wait for the installation process to finish.

clip_image035

Create New User Account

clip_image036

Installation Process

14. Finally, after the installation process has reached its end, reboot your machine, eject the bootable media and login to Ubuntu 15.04 using the credentials configured during the installation process.

clip_image037

Installation Complete

clip_image038

User Login

clip_image039

Ubuntu 15.04 Desktop

That’s all! Enjoy the last release of Ubuntu 15.04 on your UEFI machine. Please stay tuned for the next article concerning Ubuntu 15.04 where we will be discussing what to do after you have installed Ubuntu on your machine.


Taken From: http://www.tecmint.com/ubuntu-15-04-installation-on-uefi-firmware/

Friday, December 18, 2015

Cisco - Packet Sniffing on a Router

This is very cool and usefull feature that not many people know about, this allows you to capture packets like you do with a PC using Wireshark, and then export them to a file so that you can open and analise it with Wireshark.

This feature is called Cisco’s Embedded Packet Capture (EPC), and it has been around  since IOS 12.4.20T.

Here Im going to show you how to:

  • Capture (Buffer)
  • Save capture to a file on the router’s flash
  • Export the file to a TFTP server on a PC

I tested this on GNS3, this is the topology I created:

PIC1(cut)

you can download my lab at:

note that the PC and Server in the topology are also routers so that you can test it out all in GNS3.

The only external device is the TFTP server, for which I used a host on my local network.


PC1

enable
conf t

interface FastEthernet 0/0
ip address 192.168.2.1 255.255.255.0
no shutdown

ip route 0.0.0.0 0.0.0.0 192.168.2.254
do write


SERVER

enable
conf t

interface FastEthernet 0/1
ip address 172.16.2.1 255.255.255.0
no shutdown
ip route 0.0.0.0 0.0.0.0 172.16.2.254

do write


TFTP SERVER

image_thumb1


ROUTER

enable
conf t

interface FastEthernet 0/0
description *** PC1 - LAN ***
ip address 192.168.2.254 255.255.255.0
no shutdown

interface FastEthernet 0/1
description *** SERVER - LAN ***
ip address 172.16.2.254 255.255.255.0
no shutdown

interface FastEthernet 1/0
description *** TFPT - YOUR REAL LAN ***
ip address 192.168.1.240 255.255.255.0
no shutdown

exit

!--- Capture Buffer ------------------------------------------------------
monitor capture buffer BUFFER_CAP size 1024 linear

!-- ID Traffic (ACL) to Capture -------------------------------------
conf t

ip access-list extended ACL_TRAFFIC_SEL  
permit ip host 192.168.2.1 host 172.16.2.1
permit ip host 172.16.2.1  host 192.168.2.1

exit

!-- Relate Buffer and ACL (ID Traffic) --------------------------
monitor capture buffer BUFFER_CAP filter access-list ACL_TRAFFIC_SEL

!-- Capture Point - Fe0 ------------------------------------------------
!!!!!!!!!!!!!!!!!!!!!!!!!!!!!!!!!!!!!!!!!!!!!!!!!
! CEF needs to be On
!!!!!!!!!!!!!!!!!!!!!!!!!!!!!!!!!!!!!!!!!!!!!!!!!

conf t
  ip cef
exit

monitor capture point ip cef CAPTURE_POINT_FE0 FastEthernet 0/0 both

!-- Relate Buffer to Capture Point -------------------------------
monitor capture point associate CAPTURE_POINT_FE0 BUFFER_CAP

!-- Start / Stop Capture -----------------------------------------------
!!!!!!!!!!!!!!!!!!!!!!!!!!!!!!!!!!!!!!!!!!!!!!!!!
! Start Capture
!!!!!!!!!!!!!!!!!!!!!!!!!!!!!!!!!!!!!!!!!!!!!!!!!

monitor capture point start CAPTURE_POINT_FE0

!!!!!!!!!!!!!!!!!!!!!!!!!!!!!!!!!!!!!!!!!!!!!!!!!
! Stop Capture
!!!!!!!!!!!!!!!!!!!!!!!!!!!!!!!!!!!!!!!!!!!!!!!!!

monitor capture point stop CAPTURE_POINT_FE0

!--TSHOOT ------------------------------------------------------------------
show monitor capture buffer all parameters             ! Config and Stats
show monitor capture buffer BUFFER_CAP dump    ! Captured Data
show monitor capture buffer BUFFER_CAP               ! Captured Data - Summary
show monitor capture point all

!-- Export Data to TFTP Server –-----------------------------------
monitor capture point stop CAPTURE_POINT_FE0
monitor capture buffer BUFFER_CAP export tftp://192.168.1.30/capture.pcap

!!!!!!!!!!!!!!!!!!!!!!!!!!!!!!!!!!!!!!!!!!!!!!!!!!!!!!!!!!!!!!!!!!!!!!!!!!!!!!!!!
! The capture.pcap opens on Wireshark
! if you have Wireshark installed just
! double click on the file to open it
! on wireshark
!!!!!!!!!!!!!!!!!!!!!!!!!!!!!!!!!!!!!!!!!!!!!!!!!!!!!!!!!!!!!!!!!!!!!!!!!!!!!!!!!

do write

Now on the TFTP SERVER you have a capture.pcap file:

image_thumb2

that you can open with a double click on it if you have Wireshark instaled.

image_thumb4

And there you have it…. start Sniffing…… wlEmoticon-smile2

image_thumb5

Related Links

Monday, November 23, 2015

Cisco - Linux Commands on IOS


Today we’re going to go over a little known shell in IOS that gives us some bash like functionality! It is called IOS.sh

We can enable this little known functionality with the terminal shell command, like the rest of the terminal commands this only enables IOS.sh for the current terminal session.

R1#terminal shell

If you want to have the shell enabled permanently with the following global command

R1(config)#shell processing full

R1#show terminal | in Shell
Shell: enabled
Shell trace: off

Now IOS.sh is enabled! Awesome! But what does it do?
The simple answer is it makes IOS more like a Linux shell, it allows us to create variables, make loops, and use some linux utilities like grep or wc on the shell.


Using GREP

One of the neatest features of IOS.sh is the ability to use the grep utility to filter output. Let’s start by looking at the manpage for Grep, yes there are manpages!

R1#man grep
NAME
grep - get regular expression

SYNOPSIS
    grep [OPTIONS] <Regular Expression> [<file>...]

DESCRIPTION
    The 'grep' command matches lines in the given files
    with the supplied regular expression, and prints matching
    lines. There are lots of options
   
    -b              - match everything in a file after pattern
    -c              - print a count of lines instead of matched lines
    -e <pat>    - use &lt;pat&gt; as the pattern (it may have a leading minus)
    -h             - do not print filename for each match (default)
    -H             - print filename for each match
    -i              - ignore case
    -l              - print only files with match
    -L             - print only files without match
    -m            - match everything in a matching mode
    -n             - print line numbers along with matches
    -q             - quiet, only set status
    -s             - supress printing errors
    -u             - match everything in a file until pattern
    -v             - invert match, print non-matching lines

Part of the power of this command is because you can be more flexible than the standard include pipe command because you can do things like combine include and exclude like statements in the same line.

R1#show ip route | grep (150) | grep (10003)    
O        150.1.2.2 [110/10003] via 155.1.146.4, 15:51:41, GigabitEthernet1.146
O        150.1.3.3 [110/10003] via 155.1.146.4, 15:51:41, GigabitEthernet1.146
O IA     150.1.22.22 [110/10003] via 155.1.146.4, 1d11h, GigabitEthernet1.146

R1#show ip route | grep (150) | grep -v (10003)
      150.1.0.0/32 is subnetted, 11 subnets
C        150.1.1.1 is directly connected, Loopback0
O        150.1.4.4 [110/2] via 155.1.146.4, 15:51:57, GigabitEthernet1.146
O        150.1.5.5 [110/3] via 155.1.146.4, 15:51:57, GigabitEthernet1.146
O        150.1.6.6 [110/2] via 155.1.146.6, 1d12h, GigabitEthernet1.146
O IA     150.1.7.7 [110/3] via 155.1.146.6, 1d12h, GigabitEthernet1.146
O IA     150.1.8.8 [110/4] via 155.1.146.4, 15:52:07, GigabitEthernet1.146
O IA     150.1.9.9 [110/4] via 155.1.146.6, 1d12h, GigabitEthernet1.146
O IA     150.1.10.10 [110/5] via 155.1.146.4, 15:52:07, GigabitEthernet1.146

R1#show ip route | grep 150 | grep -v 10003 | grep 6\.6
O 150.1.6.6 [110/2] via 155.1.146.6, 00:35:18, GigabitEthernet1.146
O IA 150.1.7.7 [110/3] via 155.1.146.6, 00:35:08, GigabitEthernet1.146
O IA 150.1.9.9 [110/4] via 155.1.146.6, 00:35:08, GigabitEthernet1.146


WC

WC can be used to count the number of things in the output.

R1#man wc
NAME
    wc

SYNOPSIS
    wc [OPTION]... [FILE]...

DESCRIPTION
    Print newline, word, and byte counts for each FILE, and a total line if
    more than one FILE is specified. Read pipe input if no files are given
    -c print the byte counts
    -m print the character counts
    -l print the newline counts
    -L print the length of the longest line
    -w print the word counts

R1#show run | wc -l
216


Heads and Tails

These commands can be used to show the top x or bottom x lines of output, this can be handy with trying to see the latest logs.

R1#man head
NAME
    head - print the first lines in the input

SYNOPSIS
    head [<n>]

DESCRIPTION
    The 'head' program will print the first lines in
    its input. If given a numeric argument, it will
    print that many lines. The default number of lines
    is 10.


R1#man tail
NAME
    tail - print the last lines in the input

SYNOPSIS
    tail [<n>]

DESCRIPTION
    The 'tail' program will print the last lines
    in its input. If given a numeric argument, it
    will print that many lines. The default number
    of lines is 10.
    R1#

R1#show run | head 10
Building configuration...

Current configuration : 2844 bytes
!
! Last configuration change at 18:14:38 UTC Tue Nov 17 2015
!
version 15.5
no service timestamps debug uptime
no service timestamps log uptime
no platform punt-keepalive disable-kernel-core

R1#show run | tail 10
exec-timeout 0 0
privilege level 15
logging synchronous
stopbits 1
line vty 0 4
privilege level 15
no login
!
!
end


CAT

Ok fine, we can use the cat command to view text files on the Cisco device.

R1#man cat
NAME
    cat - write files or standard input to output

SYNOPSIS
    cat [<file>...]

DESCRIPTION
    The cat command writes whatever it sees to its output

    R1#copy running-config flash:cat.test
    Destination filename [cat.test]?
    2844 bytes copied in 0.463 secs (6143 bytes/sec)


R1#cat flash:cat.test
!
! Last configuration change at 18:14:38 UTC Tue Nov 17 2015
!
version 15.5
no service timestamps debug uptime
no service timestamps log uptime
no platform punt-keepalive disable-kernel-core
platform console serial


Variables

Lets start with making variables by first looking at the variables

R1#man variables
NAME
    variables - describe the usage of variables

DESCRIPTION
    Variables can be used in any context except single quotes. Variables
    can either be named, or numbered parameters to functions. Setting a
    named variable can be accomplished using an assignment statement.
    Assignment statments have a specific form, which is that the name of
    the variable must be immediately followed by an '=' sign. There can be
    no whitespace between the name and the '=':

    router> MYVAR='abc'

    The right side of the assignment is any string, but can also be the
    result of execution of a backquote expression, or the evaluation of a
    variable expansion.

    Variables may be used anywhere in subsequent input lines. One could,
    for example, create a shortcut for an interface name, and use it in
    config mode, or create a variable containing a number, and increment
    its value using arithmetic expression syntax (see man expressions).

    The main issue here is that the variable introduction character may
    conflict with existing usages, and so must be escaped in situations
    where a compatibility issue may arise. Please see man compatibility
    for more information.

To make a variable you simply have to enter VariableName=VariableValue

R1#VAR1=Value1
R1#VAR2=Value2

We can view the contents with the echo command

R1#echo $VAR1 $VAR2
Value1 Value2

You can also use variables in your commands

R2#var1=150.1.4.4

R2#ping $var1
Type escape sequence to abort.
Sending 5, 100-byte ICMP Echos to 150.1.4.4, timeout is 2 seconds:
!!!!!
Success rate is 100 percent (5/5), round-trip min/avg/max = 71/100/167 ms


Conditions and Loops

Following comparison operators can be used for working with integer values:
Operators   Characteristics
-eq               ==
-ne               !=
-lt                 <
-gt                >
-ge               >=
-le                =<

For working with files following conditions are available:

Operator    Characteristics
-a  or –e      True if file exists
-d               True if file exist and it is a directory
-f                True if file exists and is a regular file
-r                True if file exists and is readable
-s               True if file exists and has a size greater than zero
-w               True if file exists and is executable
-nt              Test if file1 is newer than file2. The modification date on the file is used for this comparison
-ot              Test if file1 is older than file2

Loops are very powerful (and dangerous if you don’t terminate them correctly) tools that allow you to carry out complex tasks.

R1#for x in 1 2 3 4 5 6 7 8 9
do..done>do
do..done>;ping 150.1.$x.$x
do..done>done

Type escape sequence to abort.
Sending 5, 100-byte ICMP Echos to 150.1.1.1, timeout is 2 seconds:
!!!!!
Success rate is 100 percent (5/5), round-trip min/avg/max = 5/13/39 ms
Type escape sequence to abort.
Sending 5, 100-byte ICMP Echos to 150.1.2.2, timeout is 2 seconds:
!!!!!
Success rate is 100 percent (5/5), round-trip min/avg/max = 64/140/228 ms
Type escape sequence to abort.
Sending 5, 100-byte ICMP Echos to 150.1.3.3, timeout is 2 seconds:
!!!!!
Success rate is 100 percent (5/5), round-trip min/avg/max = 52/91/186 ms
Type escape sequence to abort.
Sending 5, 100-byte ICMP Echos to 150.1.4.4, timeout is 2 seconds:
!!!!!
Success rate is 100 percent (5/5), round-trip min/avg/max = 31/61/117 ms
Type escape sequence to abort.
Sending 5, 100-byte ICMP Echos to 150.1.5.5, timeout is 2 seconds:
!!!!!
Success rate is 100 percent (5/5), round-trip min/avg/max = 42/73/117 ms
Type escape sequence to abort.
Sending 5, 100-byte ICMP Echos to 150.1.6.6, timeout is 2 seconds:
!!!!!
Success rate is 100 percent (5/5), round-trip min/avg/max = 34/51/93 ms
Type escape sequence to abort.
Sending 5, 100-byte ICMP Echos to 150.1.7.7, timeout is 2 seconds:
!!!!!
Success rate is 100 percent (5/5), round-trip min/avg/max = 53/73/97 ms
Type escape sequence to abort.
Sending 5, 100-byte ICMP Echos to 150.1.8.8, timeout is 2 seconds:
!!!!!
Success rate is 100 percent (5/5), round-trip min/avg/max = 67/98/116 ms
Type escape sequence to abort.
Sending 5, 100-byte ICMP Echos to 150.1.9.9, timeout is 2 seconds:
!!!!!
Success rate is 100 percent (5/5), round-trip min/avg/max = 78/98/122 ms


Functions

Lastly for this blog entry, you can define functions to make repeated tasks easier.

R1#function test-r1() {
{..} >ping 150.1.4.4
{..} >}
R1#

R4#test-r1
Type escape sequence to abort.
Sending 5, 100-byte ICMP Echos to 150.1.5.5, timeout is 2 seconds:
!!!!!
Success rate is 100 percent (5/5), round-trip min/avg/max = 26/39/63 ms


You can see the functions defined on the system with show shell function

R4#show shell functions
User defined functions:

Function namespace: DEFAULT
    R1#function test-r1()
    {
     ping 150.1.5.5
    }


Taken From:

Sunday, November 15, 2015

Networking - Structured Cabling


Structured Cabling

Although the physical layout of a network will to some extent be determined by its size and the type of networking technology chosen, the cabling system is a critical element of any network. It is generally accepted that a significant number of network failures are caused primarily by cable-related problems. Getting the cabling system right, therefore, is essential for an effective data communications system. With this need in mind, the development of industry standards for cabling standards has accompanied developments in network and communication technology. National and international telecommunications cabling standards have been widely adopted, all of which are based on the American ANSI/TIA/EIA cabling standards. The standards have been evolving since the mid-1980s, with the aim of creating a structured system for data communications cabling systems used in buildings that would support multi-vendor networking products and environments. The result was the TIA/EIA 568 Commercial Building Telecommunication Cabling standard, released in 1991. The ISO/IEC-11801 Generic Customer Premises Cabling standard is an international cabling standard based on the ANSI/TIA/EIA-568 cabling standard. Related European standards include EN 50173 and EN 50174.

The standards define how to design, build, and manage a cabling system that is structured, meaning that the system consists of a number of discrete sub-systems or blocks, each of which has specific performance characteristics. The blocks are organised hierarchically within a unified communication system. A workgroup LAN block, for example, has lower-performance requirements than a network backbone block, which usually requires high-performance fibre-optic cable. The standards have evolved to support high-speed networking technologies such as Gigabit Ethernet, and advanced cable types such as Category 6 and Category 7 twisted pair cable.

Structured cabling (sometimes referred to as premise wiring) defines a generic telecommunication wiring system for commercial buildings, and comprises the cabling, connectors and accessories used to connect local area network and telephone system equipment within a building. It breaks cabling systems down into two main elements, horizontal wiring and vertical (or backbone) wiring. Structured cabling standards define the media, topology, termination and connection points, and administrative practice to be used.
Some terms of reference are defined below:

  • Horizontal wiring - all cabling between the telecommunications outlet in a work area and the horizontal cross-connect (also known as a floor distributor) in the telecommunications closet, including the telecommunications outlet itself, an optional consolidation point (or transition point) connector, and the horizontal cross-connect. Horizontal wiring, as the name suggests, usually runs horizontally (e.g. above suspended ceilings or below computer flooring) and does not go up or down between floors in a building. The maximum distance allowed between the telecommunications closet and the communication outlets is 90 metres, regardless of cable type. An additional 6 meters is allowed for patch cables at the telecommunication closet and in the work area, but the combined length of these patch cables cannot exceed 10 meters. The horizontal cable should be four-pair 100Ω UTP cable (the latest standards specify Category 5E as a minimum), two-fibre 62.5/125-mm fibre-optic cable, or 50/125-mm multimode fibre-optic cable.
  • Vertical (or backbone) wiring - runs up through the floors of a building (risers) or across a campus, and is the cable used between telecommunications closets, entrance facilities, equipment rooms and buildings, including all cables, cable terminations, and intermediate and main cross connects. Backbone wiring runs between telecommunications closets, equipment rooms and entrance facilities on the same floor, from floor to floor, and even between buildings. The standards specify a hierarchical star topology for backbone cabling, in which all wiring radiates from a central location called a main cross-connect (usually the telecommunications closet). Each telecommunications closet or entrance facility is either cabled directly to the main cross-connect, or via intermediate cross connects. The distance limitations for this cabling depend on the type of cable used and the facilities it connects (twisted pair cable is limited to 90 meters).
  • Work area - a building space in which operatives utilise telecommunications equipment. It includes all cable components between communication outlets (wall sockets) and end-user telecommunications equipment, such as telephones, workstations and printers, including the communication outlet itself. Work area cabling systems are designed to be flexible, but still require careful management. Standard structured cabling installation procedures should be observed when installing work area outlets, and cable terminations should be carried out using the same standard (T568A or T568B) throughout the system to avoid problems like crossed pairs which may arise if standards are mixed. T568B is the more commonly used standard in data applications. The standard requires that two outlets should be provided at each wall plate - one for voice, and one for data.
  • Telecommunications  room/closet (or wiring) - an enclosed area, such as a room or a cabinet, for housing telecommunications equipment, distribution frames, cable terminations and cross connects. In other words, all the hardware required to connect horizontal wiring to vertical wiring. This area will often also house auxiliary equipment, including network file servers. Every building must have at least one wiring closet, and the standard recommends one per floor. Specific closet sizes are also recommended, depending on the size of the service area. There must be sufficient space for service personnel to perform maintenance and carry out other duties, as well as for all of the required hardware. Lighting, power supplies and environmental conditions should also meet the requirements specified by the standard.
  • Equipment room - the space that houses building telecommunications systems such as PBXs, servers, switches etc., and the mechanical terminations of the telecommunications wiring system. It is considered to be different from a telecommunications closet because of the complexity of the components it houses. An equipment room can either take the place of a telecommunications closet or be a separate facility. The functions of an equipment room may even be incorporated in a wiring closet. The equipment room provides a termination point for vertical (backbone) cabling that is connected to one or more telecommunication closets. It may also be the main cross-connection point for the entire facility. In a campus environment, each building may have its own equipment room, to which telecommunication closet equipment is connected, and the equipment in this room may then be connected to a central campus facility that provides the main cross-connect for the entire campus.
  • Entrance facility - contains the telecommunication service entrance to the building, and may also contain campus-wide backbone connections. It also contains the network demarcation point, which is the interconnection to the local exchange carrier's telecommunication facilities. The demarcation point is typically 12 inches from where the carrier's facilities enter the building, but the carrier may designate otherwise.
  • Cabling administration - this is a process that includes all aspects of premise wiring activities related to documenting, managing, and testing the system, as well as compiling and maintaining the architectural plans for the system.

clip_image001

image

image


Structured cabling elements

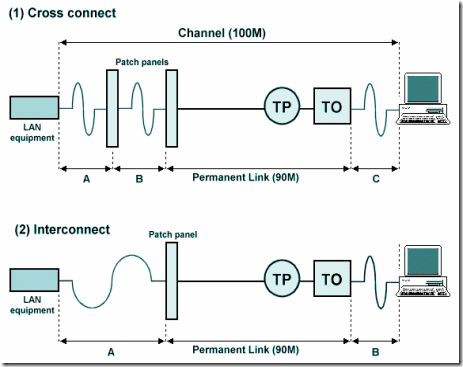
The diagrams below show the relationship between the horizontal cabling elements in a structured cabling system for both a cross-connect and aninterconnect arrangement. In both cases, the permanent link is the telecommunications outlet (TO), the horizontal cabling, and the horizontal interconnect (patch panel). An optional transition point (TP) is allowed within the 90 metres of horizontal cabling.

clip_image002


Horizontal cabling elements

The channel is the work area cable (the patch lead) from the terminal equipment into the terminal outlet, the permanent link as already described, a patch cord linking two patch panels, and a final equipment cable into the LAN equipment. The use of two patch panels (a cross-connect) is optional. In many systems, only one is used (an interconnect). Note that in the interconnect version, the maximum combined length of patch cords A and B is 10 metres. In the cross-connect arrangement, the maximum combined length of patch cords A, B and C is also 10 metres.


Some requirements and recommendations

  • Permanent links must not exceed 90 metres.
  • The combined length of patch cords in any channel must not exceed 10 metres.
  • There should be no more than two levels of cross-connect in the backbone. This allows a horizontal cross-connect between the horizontal cabling and the building backbone, and an intermediate cross-connect between the building backbone and a campus backbone, with all campus cables terminating in the main cross-connect.
  • A total of 2000 metres of backbone cabling may be employed, consisting of up to 500 metres of building backbone and 1500 metres of campus backbone.
  • Campus cabling links communications facilities in different buildings and is likely to be optical fibre.
  • A minimum of one horizontal cross connect (or floor distributor) should be provided for every floor (one per 1000 m2 of office space is recommended). One telecommunications outlet should be provided at each work area. A minimum of two per 10 m2 of floor space is recommended.

clip_image003

Backbone cabling (including campus cabling) and horizontal cabling

Recommended Cabling

Horizontal

Vertical

100Ω 4-pair UTP cabling is recommended, as it has a relatively low cost and supports a range of applications. Enhanced Category 5 (Cat5E) is the suggested minimum specification, as it will support data rates of up to 1 Gbps. Many new installations are now employing Category 6 cabling to support current and future high-bandwidth applications.

150Ω 2-pair STP is generally used for Token Ring applications, although due to its extended bandwidth it can also be used for broadband video applications up to 300 MHz, or for 155-Mbps ATM.

Coaxial cable is not recommended for horizontal wiring.

Fibre optic cable, although both more expensive more difficult to install than other types of cable, is the recommended transmission medium for backbone cabling, because it offers high speed transmission, high bandwidth, and carries data over much greater distances than copper cable. It is also immune to electromagnetic interference, and less likely to require replacement (fibre can also be used for horizontal wiring runs exceeding 100 metres).


100Ω 4-pair UTP cabling can also be used in short-to-medium distance vertical cabling in voice and data networks.
150Ω 2-pair STP can be used for Token Ring networks.


50Ω 10Base2 coaxial cable is recognised by the TIA/EIA standard as a suitable choice for economical vertical wiring, but it is rarely, if ever, used in new installations.

Based On