Friday, September 27, 2013

Arduino PIR Motion Sensor / Detector

Make your own Arduino motion sensor / detector.  Maybe you want something to happen when you walk into a room, like have the lights turn on, or have your theme song play whenever you enter.

This tutorial will show you how to get your to Arduino sense motion around it.

Hardware used in this tutorial:

· Motion Sensor for Arduino, with wire jumpers

· Arduino board (Uno, Mega, Duemilanove, etc.)

Instructions:

If this is your first Arduino project, first go through our “Arduino: Getting Started” tutorial.

Connections:

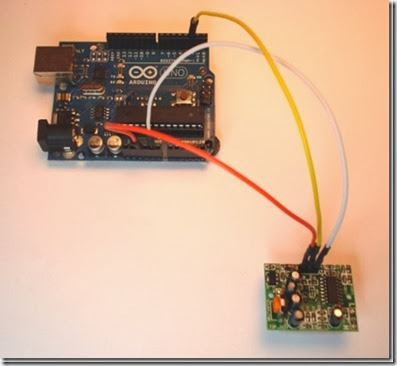
Use the supplied male to female jumpers to make these connections:

Motion Detector

Pin

Arduino Pin

"-"

GND

"Out"

Arduino Pin 2

"+"

+5v

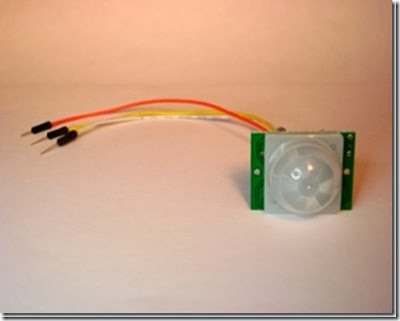
Like this:

clip_image001

Here is the front view of the module:

clip_image002

Software:

Download the example motion sensor for Arduino software here, and unzip the file

/* 
    Motion sensor for Arduino, example code
    Tutorial: 
http://www.hacktronics.com/Tutorials/arduino-motion-sensor.html
    Copyright: Mark McComb, hacktronics LLC
    License:
http://www.opensource.org/licenses/mit-license.php (Go crazy)
*/

const byte ledPin =  13;    // LED pin
const byte motionPin = 2;   // motion detector input pin
byte senseMotion = 0;       // variable to hold current state of motion detector

void setup() {
  // set the digital pin directions
  pinMode(ledPin, OUTPUT);     
  pinMode(motionPin, INPUT);
}

void loop()
{
    // Now watch for burglers
    senseMotion = digitalRead(motionPin);
    if (senseMotion == HIGH) {    // burgler found!
      digitalWrite(ledPin, HIGH);
    } else {                      // no burgler, yet...
      digitalWrite(ledPin, LOW);
    }
}

or copy the blue text above to motion_sensor_for_arduino.pde file.

You will now have a folder called “motion_sensor_for_arduino”

Start the Arduino software and load the Arduino Motion Sensor example program by clicking File->Sketchbook->Open

Navigate to the motion_sensor_for_arduino folder and select the “motion_sensor_for_arduino.pde” file.

Transfer the Arduino Motion Sensor program to your Arduino board by clicking the “Upload to I/O board” button. After uploading, you should see the LED on the Arduino board light up whenever there is motion detected.

It is that simple to add motion detection to your Arduino project.

Remember, it takes about 60 seconds after you first power up the motion sensor before it stars to detect motion.

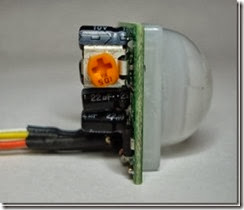
You can adjust the amount of time that the motion detector lights the Arduino LED by adjusting the potentiometer screw on the back of the motion sensor module:

clip_image003

Happy Hacking!

Based On: http://www.hacktronics.com/Tutorials/arduino-motion-sensor.html

Saturday, September 21, 2013

Cisco to Huawei – Essential Command Mapping

CISCO

HUAWEI

ping

ping

traceroute

tracert

show

display

show interfaces

display interface

Show ip route

display routing-table

Show ip interface

Display ip interface

Show version

Display version

Show ip bgp

Display bgp routing-table

Show clock

Display clock

Show port

Display port-mapping

Show flash

dir flash: (on user view mode)

Show logging

Display logbuffer

Show snmp

Display snmp-agent statistics

Show frame-relay pvc

Display fr pvc-info

Show users

Display users

Show terminal length

screen-length disable


undo screen-length disable

enable

Super

disable

Super 0 (number is privilege level from 0 to 3, where 3 is default and equivalent to “enable” on Cisco)

Conf t

System-view

exit

quit

end

return

Show policy-map interface

Display qos policy interface

send

send (on user view mode)

write terminal (sh run)

display current-configuration

Sh startup

Display saved-configuration

[no equivalent: shows the files  used for startup]

Display startup

Write erase

Reset saved-configuration

Write mem (or wr or copy run  start)

save

clear counters

reset (on user view mode)


Reset counters interface

?

?

telnet

telnet

Enable secret (conf mode)

Super pass cipher (system mode)

Term mon

term debu

clock

clock

no

undo

debug / no debug

debugging / undo debugging

copy running-config

Save safely

terminal monitor

terminal monitor

terminal length

screen-length disable


undo screen-length disable

terminal no monitor

undo terminal monitor

clear counters

reset counters interface

clear interface

reset counters interface

clear crypto

ipsec sa


ike sa

clear access-list counters

reset acl counter all

reload

reboot

shutdown

shutdown

boot

boot bootrom

Aaa

hwtacacs scheme

terminal no monitor

undo terminal monitor

tacacs-server

hwtacacs scheme (in conf  command)

snmp-server

tftp-server (in conf command)

router bgp

bgp

Router rip

rip

ip tacacs

hwtacacs nas-ip (this  command doesn’t exist !!!)

mtu

Mtu (this command doesn’t exist !!!)

clear ip cef

reset ip fast-forwarding

clear ip route *

reset ip routing-table statistics protocol all

Clear ip bgp

Reset bgp all

Show tech

display diagnostic-information

Sh ip nat translation

Display nat session

Show Controller

display controller (but not relevant for non-modular chassis)

show dsl int atm 0

display dsl status interface Atm 2/0

sho atm pvc

Display atm pvc-info

debug pvc nego

Debug atm all (very dangerous – might crash router)

sho crypto isakmp sa

Display ike sa

sho crypto isakmp key

Display ike peer

sho crypto isakmp police

Display ike proposal

Taken From : http://lifeoflogs.blogspot.pt/2011/04/cisco-vs-huawei-essential-command.html

Monday, September 9, 2013

Step 2 - Sony Xperia Arc S - Howto Install Clockworkmod

clip_image001[1]

So you have rooted your Sony Xperia Arc S and now want to flash a custom ROM? It’s definitely possible. But in order to do that, you’re gonna need a custom recovery, preferably ClockworkMod Recovery to allow installation of such ROMs and Mods. While the recovery provides options to flash new ROMs, it also lets you make backups of your current ROM to share with your friends or maybe use it to restore your device to the working condition if you’ve messed up with it. This guide shows how you can install ClockworkMod Recovery on your Xperia Arc S device and enjoy a whole new world of custom ROMs!

I. Before You Begin:

1. You must have rooetd your device before doing this procedure. Check out our procedure on Step 1 - Sony Xperia Arc S - Howto Root to root your device.

2. This works on Windows based PCs only.

II. Downloading Required Files:

1. RecoverX (Download link’s given in the first post)

RecoverX Mirror

III. Installing ClockworkMod Recovery on the Sony Xperia Arc S:

1. Place the RecoverX Tool archive onto your Desktop.

2. Unzip files from the archive over to your Desktop.

3. Enable USB debugging on your device by going to Menu>>Settings>>Developer options>>USB debugging.

4. Connect your device to your PC using the USB cable.

5. Double-click on the RecoverX’s executable file and it’ll launch.

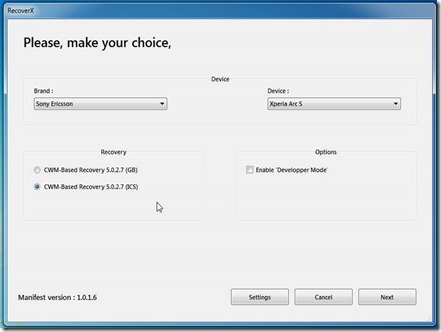
6. Select Sony Ericsson from Brand dropdown menu in the tool.

7. Select Xperia Arc S from the Device dropdown menu.

clip_image003

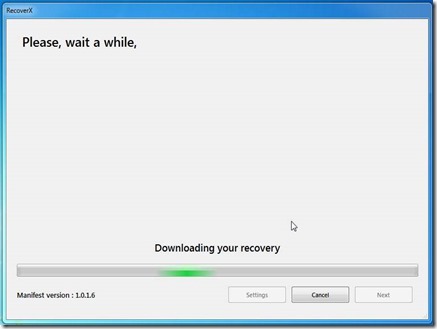
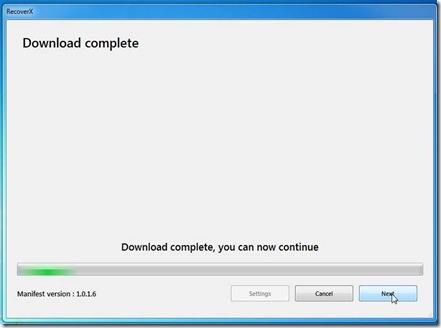
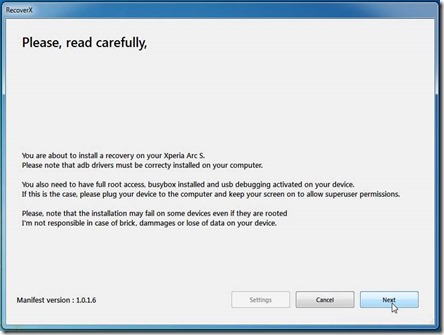
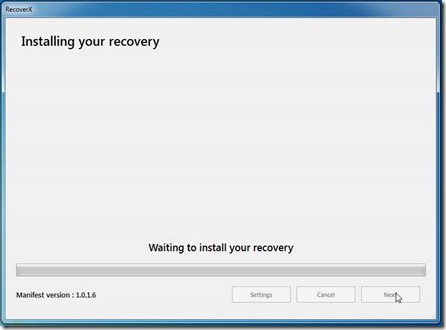
8. Now hit the Next button and it’ll start flashing the recovery on your device.

clip_image005

clip_image007

clip_image009

clip_image011

clip_image013

9. Follow any prompts you see on your screen.

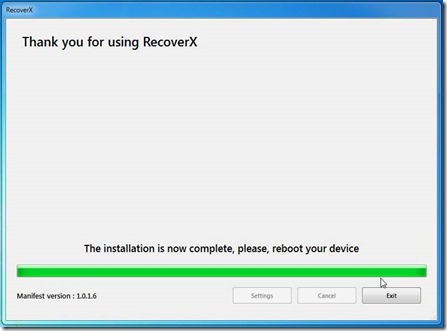
10. Once it’s done, reboot your device.

11. You’re all set! Excellent! Your Xperia Arc S has been successfully equipped with CWM Recovery and you now have endless possibilities to customize your device!

12. To access the clockworkmod menu, reboot you phone and while it’s booting, press “volume down” many times until you get the clockworkmod menu.

image

Based On: http://theunlockr.com/2013/03/31/how-to-install-clockworkmod-recovery-on-the-sony-xperia-arc-s/


Alternative Method (On Your Phone)

  1. 1.Enable “USB Debugging” (Menu>>Settings>>Developer options>>USB debugging)
  2. On you phone go to “Google Play
  3. 2. Search for “X-parts
  4. 3. Install “X-Parts
  5. 4. Run “X-Parts
  6. 5. On “X-Parts” go to tab “Installs”
  7. 6. “X-Parts” will check te internet for a clockworkmod for your, if it finds the option “Install CWM” will appear
  8. 7. Select the option “Install CWM”
  9. 8. Wait, and it should be done
  10. 9. To access the clockworkmod menu, reboot you phone and while it’s booting, press “volume down” many times until you get the clockworkmod menu.


How Root and Install Custom Roms on Xperia Arc S

Step 1 - Sony Xperia Arc S - Howto Root

Root the Sony Ericsson Arc S (LT18i) with Android 4.0.4 ICS (Official Firmware)

clip_image002

This tutorial is intended for Sony Ericsson Arc S smartphones with Locked Bootloader .

Follow the steps that are on this page to check if the Bootloader is locked or not .

http://unlockbootloader.sonymobile.com/instructions

First check if you have the the Sony PC Companion (USB Drivers) installed so that you can the smartphone the PC , if they are not download here

Now let´s begin the process :

1 - The USB debugging option must be Enabled ( Settings / Developer Options / USB debugging ).

2 - The smartphone battery should be at least 80 % -85 % .

3 - Backup the data you have on your smartphone, just in case something goes wrong .

4 - Download FlashTool for Xperia Arc S and install on your PC here

5 - Download DooMLoRD_v1_Xperia-2011-ICS-ROOT-emu-busybox-su to your PC and extract with Winrar for example here

6 - Now download the kernel Android 4.0.3 (LT18i_4.0.3_kernel.ftf) here and Android 4.0.4 (Lt18i_4.1.b.0.587_kernel) here

7 - Connect your smartphone to your computer

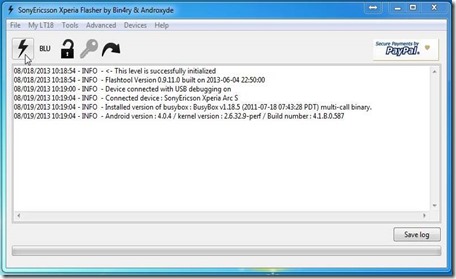
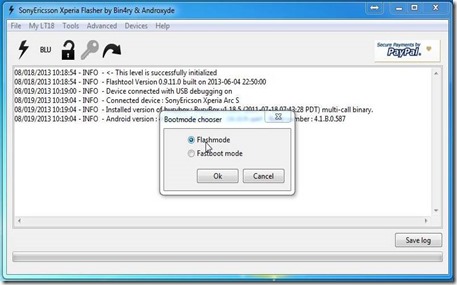
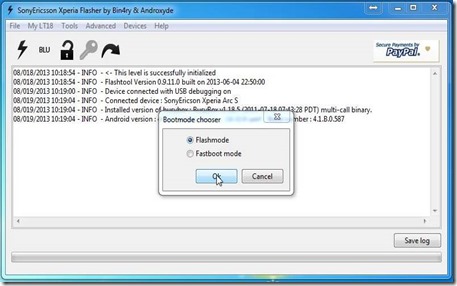
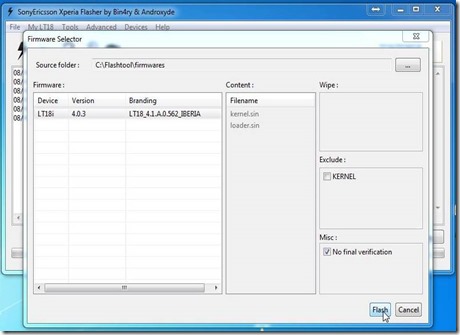
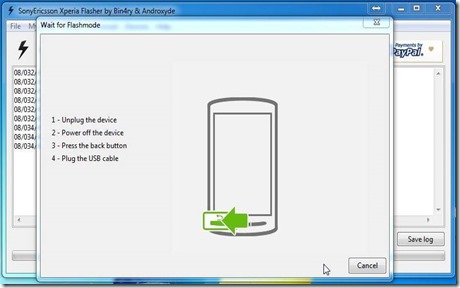
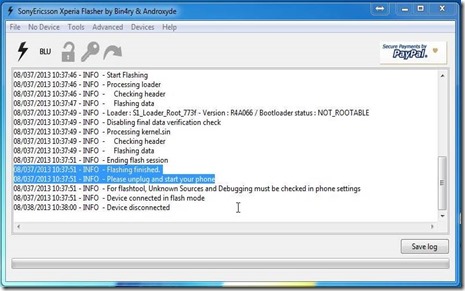
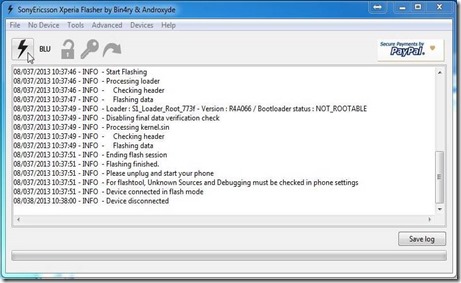
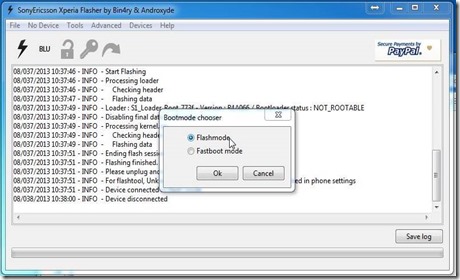
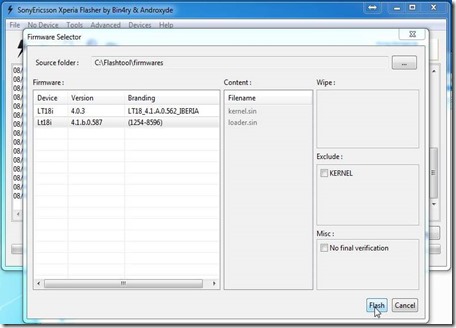
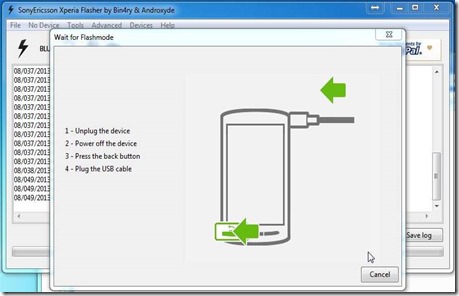
8 - Drag the Android kernel 4.0.3 into the folder " firmware " which is located inside the Flashtool folder (C :/ Flashtool / firmwares ), open the FlashTool and follow the steps as in the images below:

clip_image004

clip_image006

clip_image008

clip_image010

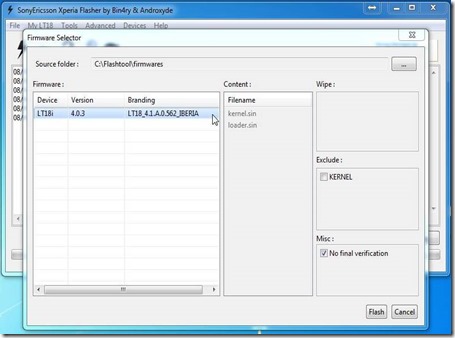
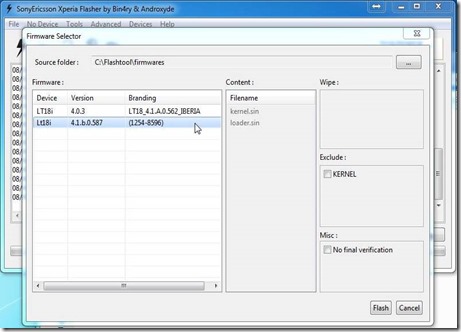
In the image below is the list of firmwares that are in the Flashtool , select LT18i_4.0.3_kernel what it says and then just push “Flash” and wait for it to be installed on the smartphone .

clip_image012

clip_image014

clip_image016

clip_image018

The smartphone will restarting during this process .

9 - The USB debugging option must be Enabled ( Settings / Developer Options / USB debugging ).

After the smartphone to be powered back on, do the following:

  • Enable the “USB Debugging” (Settings / Developer Options / USB debugging)
  • Enable the "Unknown Sources" (Menu\Settings\Security),
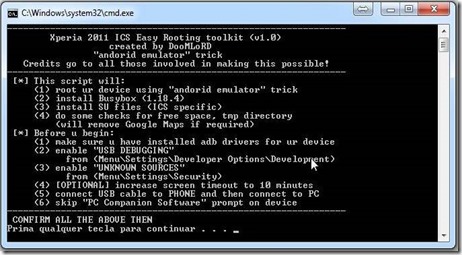
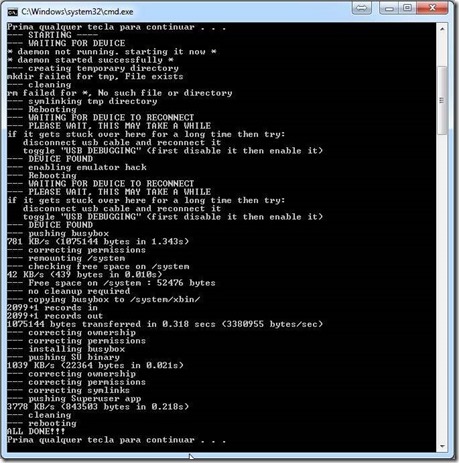
  • Run the file " runme.bat " we extracted in step 5 . The smartphone will restart 2 or 3 times, as part of the process .

clip_image020

clip_image022

Full procedure output:

clip_image024

10 - Now this process is similar to the step 8 , we drag the Android 4.0.4 (Lt18i_4.1.b.0.587_kernel) to C:/Flashtool/firmwares and do the same thing that was done in step 8.

clip_image026

clip_image028

clip_image030

In the image below selects what it says Lt18i_4.1.b.0.587_kernel and then just push “Flash” and expect it to be installed on the smartphone.

The smartphone will restarting during this process .

clip_image032

clip_image034

clip_image036

11 - If all has gone well , you now have your Sony Ericsson Arc S with Root

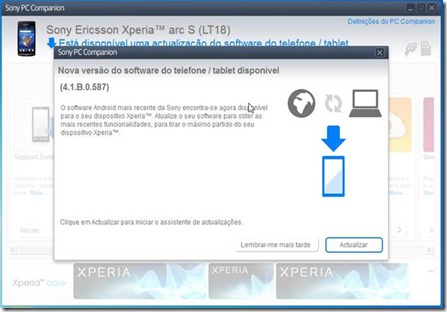
If PC Companion asks you to update just ignore.

If you update your phone will go back to the original stock rom (no root, no clockwork mod)

clip_image038

Based On: http://crimo-blog.blogspot.pt/2013/02/como-fazer-root-no-sony-ericsson-arc.html#.Ui5FyPJdZzM

How Root and Install Custom Roms on Xperia Arc S

Tuesday, September 3, 2013

RAM Disks - Explained

Your computer’s RAM is still faster than even modern solid-state drives. RAM disks take advantage of this, using your computer’s RAM as a lightning-fast virtual drive. But you probably don’t want to use a RAM disk, anyway.

RAM disks are easy to sell — all you have to do is hold up performance benchmarks showing how much faster it is to read data from RAM than it is from even a fast SSD. But this isn’t the full picture.

What’s a RAM Disk?

To create a RAM disk, you would install a third-party program that creates a virtual drive in Windows. This program would reserve a section of your RAM — so if you had 4 GB of files in your RAM disk, the disk would take up 4 GB of RAM. All the files on your disk would be stored in your RAM. When you wrote to the disk, you’d just be writing to a different section of your RAM.

Initially, this seems like it could help optimize performance. If you installed programs in a RAM disk, you’d have near-instant load times because their data would already be stored in the fastest memory possible. When you save a file, it would happen almost instantly as it would just be copied to another portion of RAM. This would mean faster application load times and faster file read/write times for files saved in the RAM disk.

clip_image004

Why You Probably Shouldn’t Use One

However, there’s a big problem here. RAM is volatile memory. When your computer loses power, the contents of your RAM will be erased. This means that you can’t store anything important on a RAM disk — if your computer crashed because of lost power, you’d lose all the data in your RAM disk. So saving files to the RAM disk is pointless unless you don’t care that you’d lose the files — but if you didn’t care about the files, why save them in the first place?

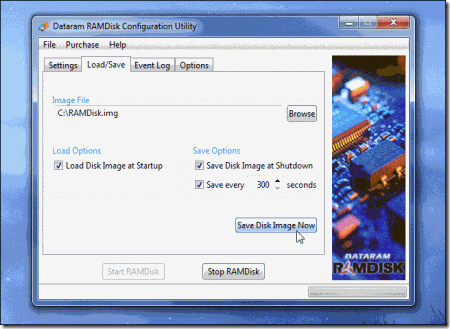
Because RAM isn’t persistent, you’d also have to save the contents of your RAM disk to disk when you shut down your computer and load them when you turn it on. For example, let’s say you installed Photoshop to your RAM disk. You’d have to save an copy of your RAM disk to your computer’s hard drive to ensure you wouldn’t lose your Photoshop installation. You may want to do this automatically every few minutes or just at shut down.

When you turn on your computer, the RAM disk program would have to read the RAM disk image from your hard drive and load it back into RAM. In other words, you’re simply getting faster program-load times at the expense of longer boot-up times. Once your computer loads an application or other files form its hard drive, it caches them in RAM anyway — so it’s a bit silly to install an application or game in a RAM disk rather than on your hard drive. Either way, once you load the application, it will stay present in your memory for quick loading later.

clip_image006

RAM disks also reserve a good chunk of your memory, ensuring you can’t use it for anything else. Windows uses unused memory to cache files anyway, and it does it all automatically and in the background. If you need the memory for something, Windows will instantly discard the cached data. With a RAM disk, you’d have to shut it down manually to free up memory.

How You Would Make a RAM Disk

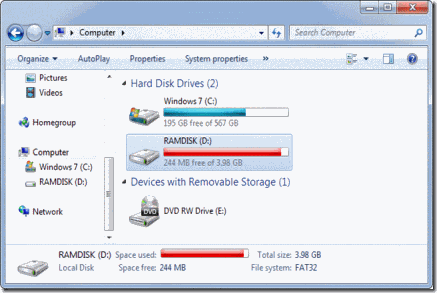
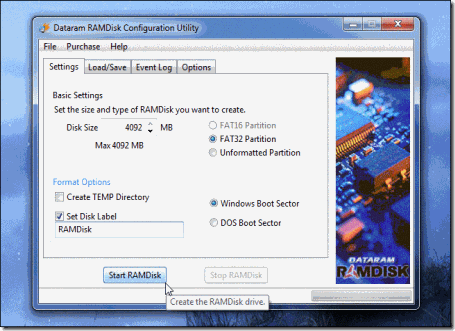
Making a RAM disk is pretty simple. Install a program like DataRAM’s RAMDisk Personal — the free version allows you to create RAM disks up to 4 GB in size — and use it to create a new RAM disk.

You can then install programs to it or move files to it. You’ll want to save a copy of the RAM disk so you won’t lose the data if your computer ever goes down. Of course you’ll have to save a new image every time you update the files on the RAM disk.

clip_image009

There Must Be Some Uses For a RAM Disk, But…

RAM disks aren’t a complete scam like PC cleaning programs and many other “system-optimization” tools are. It’s definitely faster to read and write from RAM rather than to use even a fast SSD. There are likely some good uses for RAM disks if you really know what you’re doing.

However, both of the following would have to be true:

· You’d have to be using a program doesn’t normally use RAM as a cache and instead insists on reading and writing small files to your hard drive.

· You’d have to not care about any of these files and have no problem if you lose them.

This is a high bar to clear — most programs that have a cache you don’t necessarily care about will use RAM, anyway. For example, there’s no point in placing Photoshop’s scratch file on a RAM disk because Photoshop uses RAM as a cache if it’s available. Your web browser will store its cache files in RAM if there’s space, too.

For programs that do write and read data from the hard drive, this data is likely something you don’t want to lose. Using a RAM disk with an important database would be a mistake because you’d lose the database if a crash or power loss occurred.

RAM-Based Solid-State Drives

If you do want to benefit from the speed of RAM, you may want to try investing in a RAM-based solid-state drive. These are solid-state drives that contain RAM instead of typical Flash memory. They’re much faster to read and write to, but also much more expensive because RAM is more expensive than Flash memory.

Such drives contain a battery, so they can maintain the contents of the RAM if the computer loses power. They  have enough battery power to write the data to offline memory, ensuring you won’t lose whatever you stored in their RAM.

Such drives aren’t for the average user — they’re extremely expensive options intended for data centers and other business uses where you want the speed of RAM with the stability of SSDs. But these drives make much more sense than software RAM disks if you really need RAM-like speeds for mission critical purposes.

In summary, RAM disks do work as advertised. But you probably don’t want to use them, anyway. They’re not ideal for running an important database or speeding up game load times.

If you do have a smart use for a RAM disk, leave a comment — we’d like to know what people are actually using them for.

Taken From: http://www.howtogeek.com/171432/ram-disks-explained-what-they-are-and-why-you-probably-shouldnt-use-one/

Friday, August 23, 2013

Cisco BGP - Prevent Transit AS

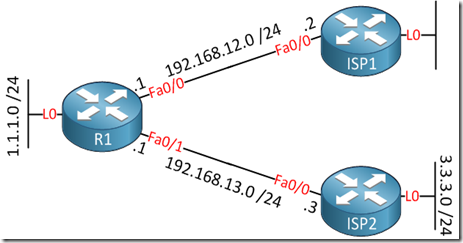
By default BGP will advertise all prefixes to EBGP (External BGP) neighbors. This means that if you are multi-homed (connected to two or more ISPs) that you might become a transit AS. Let me show you an example:
R1-two-ISPs-3-loopback

R1 is connected to ISP1 and ISP2 and each router is in a different AS (Autonomous System). Since R1 is multi-homed it’s possible that the ISPs will use R1 to reach each other. In order to prevent this we’ll have to ensure that R1 only advertises prefixes from its own autonomous system.

As far as I know there are 4 methods how you can prevent becoming a transit AS:
- Filter-list with AS PATH access-list.
- No-Export Community.
- Prefix-list Filtering
- Distribute-list Filtering

Prefix-lists or distribute-lists will work but it’s not a very scalable solution if  you have thousands of prefixes in your BGP table. The filter-list and no-export community work very well since you only have to configure them once and it will not matter if new prefixes show up. First we’ll configure BGP on each router:

R1(config)#router bgp 1
R1(config-router)#
neighbor 192.168.12.2 remote-as 2
R1(config-router)#neighbor 192.168.13.3 remote-as 3

ISP1(config)#router bgp 2
ISP1(config-router)#neighbor 192.168.12.1 remote-as 1

ISP2(config)#router bgp 3
ISP2(config-router)#neighbor 192.168.13.1 remote-as 1

The commands above will configure EBGP (External BGP) between R1 – ISP1 and R1 – ISP2. To make sure we have something to look at, I’ll advertise the loopback interfaces in BGP on each router:

R1(config)#router bgp 1
R1(config-router)#network 1.1.1.0 mask 255.255.255.0

ISP1(config)#router bgp 2
ISP1(config-router)#network 2.2.2.0 mask 255.255.255.0

ISP2(config)#router bgp 3
ISP2(config-router)#network 3.3.3.0 mask 255.255.255.0

With the networks advertised, let’s take a look at the BGP table of ISP1 and ISP2 to see what they have learned:

ISP1#show ip bgp
BGP table version is 4, local router ID is 11.11.11.11
Status codes: s suppressed, d damped, h history, * valid, > best, i - internal, r RIB-failure, S Stale

Origin codes: i - IGP, e - EGP, ? - incomplete

   Network          Next Hop            Metric LocPrf Weight Path
*> 1.1.1.0/24       192.168.12.1          0             0         1 i
*> 2.2.2.0/24       0.0.0.0                  0         32768       i
*> 3.3.3.0/24       192.168.12.1                                   0 1 3 i

ISP2#show ip bgp
BGP table version is 4, local router ID is 33.33.33.33
Status codes: s suppressed, d damped, h history, * valid, > best, i - internal, r RIB-failure, S Stale
Origin codes: i - IGP, e - EGP, ? - incomplete

   Network          Next Hop            Metric LocPrf Weight  Path
*> 1.1.1.0/24       192.168.13.1          0               0       1 i
*> 2.2.2.0/24       192.168.13.1                           0       1 2 i

*> 3.3.3.0/24       0.0.0.0                  0             32768   i

The ISP routers have learned about each other networks and they will use R1 as the next hop. We now have everything in place to play with the different filtering techniques.


Filter-list with AS PATH access-list

Using an filter-list with the AS PATH access-list is probably the most convenient solution. It will ensure that you will always only advertise prefixes from your own autonomous system.

Here’s how to do it:
R1(config)#ip as-path access-list 1 permit ^$

R1(config-router)#neighbor 192.168.12.2 filter-list 1 out
R1(config-router)#neighbor 192.168.13.3 filter-list 1 out

The ^$ regular expression ensures that we will only advertise locally originated prefixes. We’ll have to apply this filter to both ISPs.

Keep in mind that BGP is slow…if you are doing labs, it’s best to speed things up with clear ip bgp *

Let’s verify our configuration:

R1#show ip bgp
BGP table version is 4, local router ID is 22.22.22.22
Status codes: s suppressed, d damped, h history, * valid, > best, i - internal,
              r RIB-failure, S Stale
Origin codes: i - IGP, e - EGP, ? - incomplete

   Network          Next Hop            Metric LocPrf Weight Path
*> 1.1.1.0/24       0.0.0.0                  0         32768 i
*> 2.2.2.0/24       192.168.12.2             0             0 2 i
*> 3.3.3.0/24       192.168.13.3             0             0 3 i

R1 still knows about the prefixes from the ISP routers. What about ISP1 and ISP2?

ISP1#show ip bgp
BGP table version is 7, local router ID is 11.11.11.11
Status codes: s suppressed, d damped, h history, * valid, > best, i - internal, r RIB-failure, S Stale
Origin codes: i - IGP, e - EGP, ? - incomplete

   Network          Next Hop            Metric LocPrf Weight Path
*> 1.1.1.0/24       192.168.12.1          0                0      1 i
*> 2.2.2.0/24       0.0.0.0                  0         32768         i

ISP2#show ip bgp
BGP table version is 7, local router ID is 33.33.33.33
Status codes: s suppressed, d damped, h history, * valid, > best, i - internal, r RIB-failure, S Stale
Origin codes: i - IGP, e - EGP, ? - incomplete

   Network          Next Hop            Metric LocPrf Weight Path
*> 1.1.1.0/24       192.168.13.1                 0         0      1 i
*> 3.3.3.0/24       0.0.0.0                         0      32768     i

ISP1 and ISP2 only know about the 1.1.1.0 /24 network. Excellent, we are no longer a transit AS! On to the next method…


No-Export Community

Using the no-export community will also work pretty well. We will configure R1 so that prefixes from the ISP routers will be tagged with the no-export community. This ensures that the prefixes from those routers will be known within AS 1 but won’t be advertised to other routers.

R1(config)#route-map NO-EXPORT
R1(config-route-map)#set community no-export

R1(config)#router bgp 1
R1(config-router)#neighbor 192.168.12.2 route-map NO-EXPORT in
R1(config-router)#neighbor 192.168.13.3 route-map NO-EXPORT in

I’m only using one router in AS 1, if you have other routers and are running IBGP (Internal BGP) then don’t forget to send communities to those routers with the neighbor <ip> send-community command.

Let’s see what ISP1 and ISP2 think about our configuration:

ISP1#show ip bgp
BGP table version is 11, local router ID is 11.11.11.11
Status codes: s suppressed, d damped, h history, * valid, > best, i - internal, r RIB-failure, S Stale
Origin codes: i - IGP, e - EGP, ? - incomplete

   Network          Next Hop            Metric LocPrf Weight Path
*> 1.1.1.0/24       192.168.12.1          0               0      1  i
*> 2.2.2.0/24       0.0.0.0                  0             32768     i

ISP2#show ip bgp
BGP table version is 11, local router ID is 33.33.33.33
Status codes: s suppressed, d damped, h history, * valid, > best, i - internal, r RIB-failure, S Stale
Origin codes: i - IGP, e - EGP, ? - incomplete

   Network          Next Hop            Metric LocPrf Weight Path
*> 1.1.1.0/24       192.168.13.1          0             0         1 i
*> 3.3.3.0/24       0.0.0.0                  0         32768         i

They only know about network 1.1.1.0 /24. Onto the next method!


Prefix-List Filtering

Using a prefix-list we can determine what prefixes are advertised to our BGP neighbors. This works fine but it’s not a good solution to prevent becoming a transit AS. Each time you add new prefixes you’ll have to reconfigure the prefix-list. Anyway let me show you how it works:

R1(config)#ip prefix-list NO-TRANSIT permit 1.1.1.0/24

R1(config-router)#neighbor 192.168.12.2 prefix-list NO-TRANSIT out

R1(config-router)#neighbor 192.168.13.3 prefix-list NO-TRANSIT out

The prefix-list above will only advertise 1.1.1.0 /24 to the ISP routers. Let’s verify the configuration:

ISP1#show ip bgp
BGP table version is 17, local router ID is 11.11.11.11
Status codes: s suppressed, d damped, h history, * valid, > best, i - internal, r RIB-failure, S Stale
Origin codes: i - IGP, e - EGP, ? - incomplete

   Network          Next Hop            Metric LocPrf Weight Path
*> 1.1.1.0/24       192.168.12.1             0             0 1 i
*> 2.2.2.0/24       0.0.0.0                  0         32768 i

ISP2#show ip bgp
BGP table version is 17, local router ID is 33.33.33.33
Status codes: s suppressed, d damped, h history, * valid, > best, i - internal, r RIB-failure, S Stale
Origin codes: i - IGP, e - EGP, ? - incomplete

   Network          Next Hop            Metric LocPrf Weight Path
*> 1.1.1.0/24       192.168.13.1          0               0       1 i
*> 3.3.3.0/24       0.0.0.0                  0         32768         i

The prefix-list is working as it should, onto the last exercise!


Distribute-list Filtering

This method is similar to using the prefix-list but this time we’ll use an access-list.

R1(config)#ip access-list standard NO-TRANSIT
R1(config-std-nacl)#permit 1.1.1.0 0.0.0.255

R1(config-router)#neighbor 192.168.12.2 distribute-list NO-TRANSIT out
R1(config-router)#neighbor 192.168.13.3 distribute-list NO-TRANSIT out

Time to check the ISPs:

ISP1#show ip bgp
BGP table version is 23, local router ID is 11.11.11.11
Status codes: s suppressed, d damped, h history, * valid, > best, i - internal, r RIB-failure, S Stale

Origin codes: i - IGP, e - EGP, ? - incomplete

   Network          Next Hop            Metric LocPrf Weight Path
*> 1.1.1.0/24       192.168.12.1          0               0       1 i
*> 2.2.2.0/24       0.0.0.0                  0          32768        i

ISP2#show ip bgp
BGP table version is 23, local router ID is 33.33.33.33
Status codes: s suppressed, d damped, h history, * valid, > best, i - internal, r RIB-failure, S Stale
Origin codes: i - IGP, e - EGP, ? - incomplete

   Network          Next Hop            Metric LocPrf Weight Path
*> 1.1.1.0/24       192.168.13.1          0             0        1 i
*> 3.3.3.0/24       0.0.0.0                  0         32768        i

That’s all there is to it. I hope this has been helpful for you, if you know of any other methods to prevent becoming a BGP transit AS please leave a comment!

Taken From: http://networklessons.com/bgp/bgp-prevent-transit-as/
Thursday, August 22, 2013

Cisco IOS Resilient Image and Configuration

Last week, we looked at Recovering a Router with the Password Recovery Service Disabled. Today we're going to examine a related Cisco IOS security feature, dubbed resilient configuration. This feature enables critical router files, namely the IOS image and configuration, to persist despite destructive events such as deletion of the startup configuration or a format of the Flash filesystem. The feature does not require any external services; all persistent files are stored locally on the router.

Enabling Resilient Configuration

First, a quick review of how Cisco ISR (x800 series) routers work. The binary IOS image used to boot the router is stored on the Flash filesystem, which is a type of memory very similar to that found inside a USB thumbdrive. The startup configuration file is stored on a separate filesystem, NVRAM. The contents of both filesystems can be viewed with the dir command.

Router# dir flash:
Directory of flash:/

    1  -rw-    23587052   Jan 9 2010 17:16:58 +00:00  c181x-advipservicesk9-mz.124-24.T.bin
    2  -rw-         600  Sep 26 2010 07:28:12 +00:00  vlan.dat

128237568 bytes total (104644608 bytes free)
Router# dir nvram:
Directory of nvram:/

  189  -rw-        1396                      startup-config
  190  ----          24                      private-config
  191  -rw-        1396                      underlying-config
    1  -rw-           0                      ifIndex-table
    2  -rw-         593                      IOS-Self-Sig#3401.cer
    3  ----          32                      persistent-data
    4  -rw-        2945                      cwmp_inventory
   21  -rw-         581                      IOS-Self-Sig#1.cer

196600 bytes total (130616 bytes free)

The resilient image and configuration features are enabled with one command each.

Router(config)# secure boot-image
Router(config)#
%IOS_RESILIENCE-5-IMAGE_RESIL_ACTIVE: Successfully secured running image


Router(config)# secure boot-config
Router(config)#
%IOS_RESILIENCE-5-CONFIG_RESIL_ACTIVE: Successfully secured config archive [flash:.runcfg-20101017-020040.ar]

The combination of the secured IOS image and configuration file is referred to as the bootset. We can verify the secure configuration with the command show secure bootset.

Router# show secure bootset
IOS resilience router id FHK110913UQ

IOS image resilience version 12.4 activated at 02:00:30 UTC Sun Oct 17 2010
Secure archive flash:c181x-advipservicesk9-mz.124-24.T.bin type is image (elf) []
  file size is 23587052 bytes, run size is 23752654 bytes
  Runnable image, entry point 0x80012000, run from ram

IOS configuration resilience version 12.4 activated at 02:00:41 UTC Sun Oct 17 2010
Secure archive flash:.runcfg-20101017-020040.ar type is config
configuration archive size 1544 bytes

At this point, we notice that our IOS image file on Flash is now hidden.

Router# dir flash:
Directory of flash:/

2  -rw-         600  Sep 26 2010 07:28:12 +00:00  vlan.dat

128237568 bytes total (104636416 bytes free)

Restoring an Archived Configuration

Now suppose that the router's startup configuration file is erased (accidentally or otherwise) and the router is reloaded. Naturally, it boots with a default configuration. The resilient configuration feature will even appear to be disabled.

Router# erase startup-config
Erasing the nvram filesystem will remove all configuration files! Continue? [confirm]
[OK]
Erase of nvram: complete

Router# show startup-config
startup-config is not present
Router# reload

System configuration has been modified. Save? [yes/no]: n
Proceed with reload? [confirm]
...
Router> enable
Router# show secure bootset
%IOS image and configuration resilience is not active

To restore our original configuration, we simply have to extract it from the secure archive and save it to Flash. Next, we can replace the current running configuration with the archived config using the configure replace command.

Router(config)# secure boot-config restore flash:archived-config
ios resilience:configuration successfully restored as flash:archived-config
Router(config)# ^C

Router# configure replace flash:archived-config
This will apply all necessary additions and deletions
to replace the current running configuration with the
contents of the specified configuration file, which is
assumed to be a complete configuration, not a partial
configuration. Enter Y if you are sure you want to proceed. ? [no]: y
Total number of passes: 1
Rollback Done

Router#

Don't forget to save the running configuration once the restoration is complete (copy run start).

Be aware that the resilient configuration file is not automatically updated along with the startup configuration. To update it, you must first delete the existing resilient configuration and issue the secure boot-config command again.

Router(config)# no secure boot-config
%IOS_RESILIENCE-5-CONFIG_RESIL_INACTIVE: Disabled secure config archival [removed
flash:.runcfg-20101017-020040.ar]

Router(config)# secure boot-config
%IOS_RESILIENCE-5-CONFIG_RESIL_ACTIVE: Successfully secured config archive
[flash:.runcfg-20101017-024745.ar]
Finally, note that the secure bootset features can only be disabled from the console line.

Router(config)# no secure boot-config
%You must be logged on the console to apply this command

In fact, attempting to disable either part of the secure bootset generates a handy syslog message to alert administrators:

%IOS_RESILIENCE-5-NON_CONSOLE_ACCESS: Non console configuration request denied for command "no secure boot-config "

What About the IOS Image?

It turns out that the secure boot image feature works pretty well too. Here we can see that it persists even when the Flash filesystem appears to have been formatted.

Router# format flash:
Format operation may take a while. Continue? [confirm]
Format operation will destroy all data in "flash:".  Continue? [confirm]
Writing Monlib sectors...
Monlib write complete

Format: All system sectors written. OK...

Format: Total sectors in formatted partition: 250848
Format: Total bytes in formatted partition: 128434176
Format: Operation completed successfully.

Format of flash: complete
Router# dir
Directory of flash:/

No files in directory

128237568 bytes total (104640512 bytes free)
Router# reload
Proceed with reload? [confirm]

*Oct 17 02:37:37.127: %SYS-5-RELOAD: Reload requested  by console. Reload Reason
: Reload Command.
System Bootstrap, Version 12.3(8r)YH8, RELEASE SOFTWARE (fc2)
Technical Support:
http://www.cisco.com/techsupport
Copyright (c) 2006 by cisco Systems, Inc.
C1800 platform with 131072 Kbytes of main memory with parity disabled

Upgrade ROMMON initialized
program load complete, entry point: 0x80012000, size: 0xc0c0

Initializing ATA monitor library.......
program load complete, entry point: 0x80012000, size: 0xc0c0

Initializing ATA monitor library.......

program load complete, entry point: 0x80012000, size: 0x167e724
Self decompressing the image : #################################################
################################################################################
################################################################ [OK]

Restricted Rights Legend

Use, duplication, or disclosure by the Government is
subject to restrictions as set forth in subparagraph
(c) of the Commercial Computer Software - Restricted
Rights clause at FAR sec. 52.227-19 and subparagraph
(c) (1) (ii) of the Rights in Technical Data and Computer
Software clause at DFARS sec. 252.227-7013.

cisco Systems, Inc.
           170 West Tasman Drive
           San Jose, California 95134-1706

Cisco IOS Software, C181X Software (C181X-ADVIPSERVICESK9-M), Version 12.4(24)T,
RELEASE SOFTWARE (fc1)
Technical Support:
http://www.cisco.com/techsupport
Copyright (c) 1986-2009 by Cisco Systems, Inc.
Compiled Thu 26-Feb-09 03:22 by prod_rel_team
...
Router> enable
Password:
Router# dir
Directory of flash:/

No files in directory

128237568 bytes total (104640512 bytes free)
Router# show version
Cisco IOS Software, C181X Software (C181X-ADVIPSERVICESK9-M), Version 12.4(24)T,
RELEASE SOFTWARE (fc1)
Technical Support:
http://www.cisco.com/techsupport
Copyright (c) 1986-2009 by Cisco Systems, Inc.
Compiled Thu 26-Feb-09 03:22 by prod_rel_team
...

Taken From: http://packetlife.net/blog/2010/oct/18/ios-resilient-configuration/