Monday, November 23, 2009

Sync Your Phone With Thunderbird - Funambol

Cooking with Linux - Linux, Thunderbird and the BlackBerry—a Love Story

July 1st, 2009 by Marcel Gagné in

Keeping various devices in sync with our Linux systems can be the source of nightmares for many. After all, asking for an open-source solution that can keep millions of smartphones, cell phones, e-mail clients, contact databases and calendars on the same planet, never mind the same page, seems akin to asking for the moon—to which Chez Marcel would like to ask, “Would you

While we wait for his return, let me tell you about François' dilemma. He has multiple portable devices, including a BlackBerry, an Android phone and a Motorola RAZR, all of which he wants to synchronize with Evolution on his Linux notebook. On the store workstation, he uses Thunderbird instead, and at home, something else. Getting those contact lists, calendars and so on synchronized is easier than it sounds, and it all can be done with Linux and open-source software.

All this is possible, and easy, with a great little package from a company called Funambol. The software itself also is called Funambol, and it is freely distributed and open source. Essentially, it's a program that lets you perform over-the-air (also known as OTA) synchronization of your contacts, calendars and so on, using your cell phone or smartphone, desktop contact management software (Evolution, Thunderbird, Outlook and so forth) and other hardware. Part of the magic behind all of it is SyncML (Synchronization Markup Language), which also is known as Open Mobile Alliance Data Synchronization (OMA DS). SyncML is an open standard for synchronizing information, such as calendars and contacts, that is platform-independent. Several mobile phone manufacturers, such as Motorola, Nokia and Sony Ericsson, already include SyncML in their devices. SyncML also supports e-mail, which is handy for those needing (or just plain wanting) an alternative to proprietary products, like the BlackBerry.

Funambol consists of a server component and a client for your device or application. Start by getting your copy of Funambol server from funambol.org, and save it somewhere on your system. The package file, with a .bin extension, needs to be made executable before you execute it:

chmod +x funambol-7.1.bin ./funambol-7.1.bin 

The whole thing takes only a few seconds. The steps that follow are extremely simple. Type yes at the “agree to the above terms” prompt (it's the GPL version 3). You'll be prompted for an installation directory which, by default, is /opt. It's best to accept the default unless you have a very good reason to do otherwise. The resulting folder will be /opt/Funambol. Once the product has been extracted, you'll be asked whether you want to start the server. Type yesand continue on. To make sure things are working properly, point your browser to http://localhost:8080/funambol/ds, and you should get status information back from the Funambol data synchronization server (Figure 1).

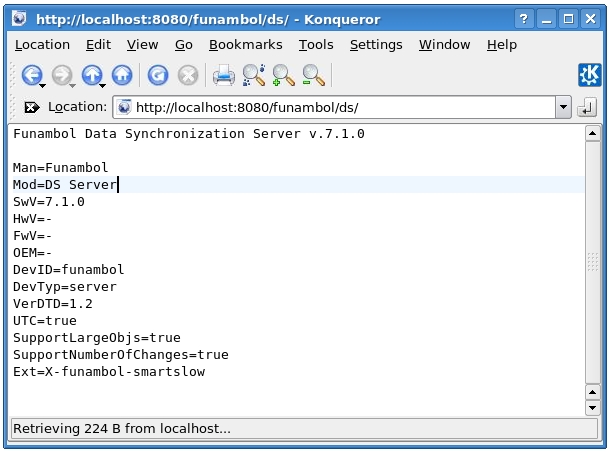
Figure 1. A Quick Test to Make Sure the Server Is Up and Running

Of course, if you aren't running this test directly on the server, you'll want to change localhost to the hostname or IP address of the server.

Funambol also comes with a simple Web app to test the contact as well as calendar creation and update before you turn it over to your mobile device. Point your browser to http://localhost:8080/funambol to bring up the demo page. You won't be able to do a great deal at this point, other than read the terms and conditions and test a very limited Web client. That demonstration will allow you to log in as guest with a password of guest and create contacts (Figure 2) or a calendar entry. Once you have done so, update a record or two, and make sure the changes are being saved.

Figure 2. The Web client demo lets you create calendars and contacts, making it a better test.

Now that you know it works, you still can't do a great deal with Funambol in this form. In order to do more interesting things, you need to do a little system configuration. On the server side, there is a graphical administration tool. You can start it from the command line like this:

cd /opt/Funambol admin/bin/funamboladmin 

A couple seconds later, you'll see the Funambol administration tool appear (Figure 3). To use the administration tool, you first need to log in. If you don't see the login window up front, click File on the menu bar, and select Login. By default, the admin password, sa, already is set (you always can change it later), but for now, simply click Login.

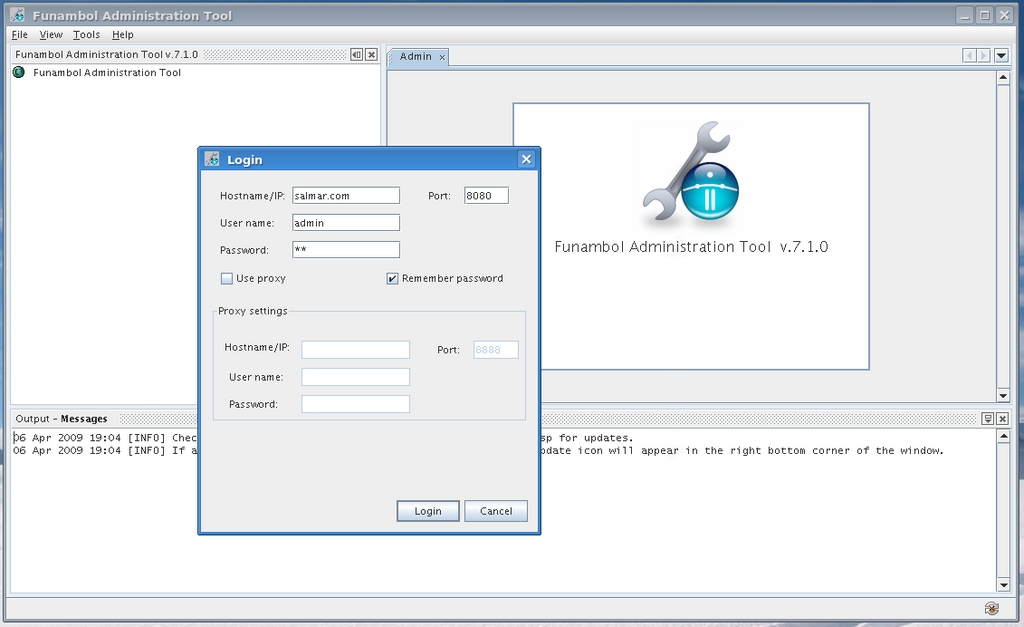
Figure 3. Funambol Administration Tool and Login Screen

The Funambol administration tool is divided into three panes: a navigator pane fills the top left half, an admin tool pane is at the top right, and a status pane is located along the bottom (Figure 4). Take a look at the navigator window, and you will see your system's domain name at the top. To expand the system tree, click the switch icon next to the domain name. You'll then see Server Settings (which expands into its own subtree), Users, Devices, Principals and Modules. That last one also expands into several other branches. To see how this all works and how you can configure and change things, let's deal with that admin password right now.

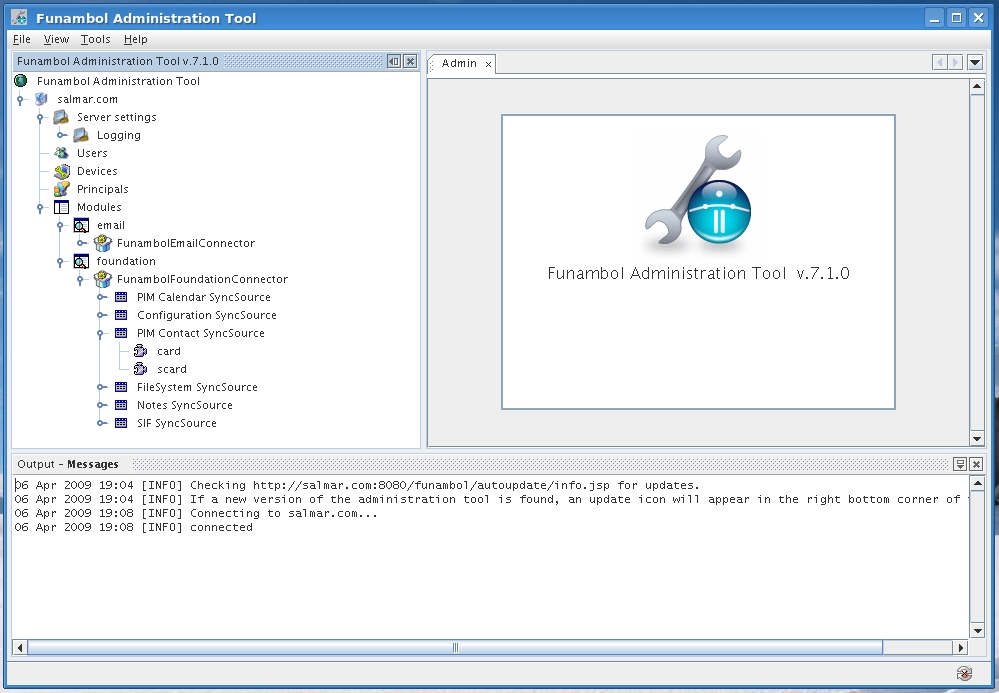
Figure 4. On the left, you can see the Funambol administration tool's system navigator with several expanded properties.

Double-click on Users and look at the admin tool window (Figure 5). The Search Users tool appears. You can search by user name, first name, last name and e-mail address. Enter admin in the search box beside Username, and click the Search button (notice that you can search by a part of the name as well as position of the text by clicking the drop-down box beside the label). Only one admin name should show up, so it naturally will be highlighted. If you did this by searching for part of a name, and you had multiple names, you would, of course, need to select the correct name.

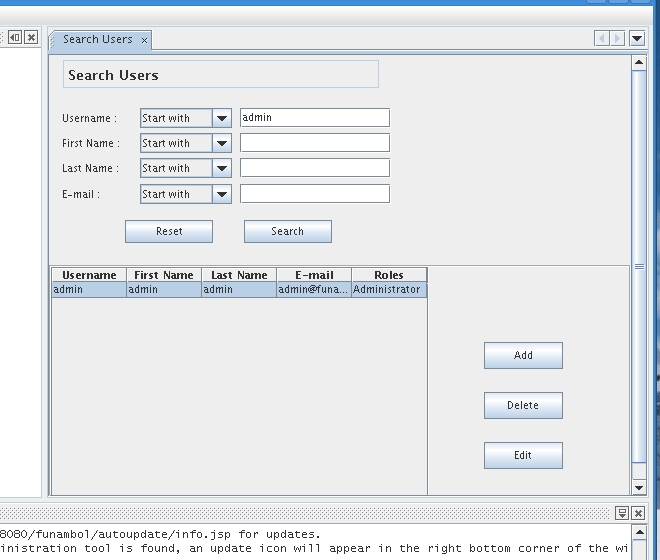
Figure 5. Using the Tool to Change the Admin Password

Click the Edit button, change the password, and then save your changes. That takes care of controlling access to the tool. Your next step is to define access to the system. As it stands, your Funambol implementation allows connections only from localhost and then only to a limited set of users. You need to change that. Double-click on Server Settings in the navigator window. Now, look to the left and locate the Server URI field in the settings window (Figure 6).

Figure 6. As a final first step, you need to configure the URI to the Funambol service on your server.

Enter the hostname (or the IP address) of your server, then click Save. You should see a confirmation message in the status window below. It should look something like this:

http://yourdomain.com:8080/funambol/ds 

Believe it or not, that's pretty much it on the server end. Now, let's take a break, have François refill everyone's glass, and then let's see what we need to do on the BlackBerry end of things.

The first step is to install the BlackBerry client, which you can find at https://www.forge.funambol.org/download/downloads-bb.html. You will see an e-mail client in addition to the sync client, but, for the sake of this article, let's just concentrate on the sync client. Make sure you get the right client for your particular BlackBerry OS version.

Once installed, you will see the Funambol BlackBerry sync icon in your list of applications on the BlackBerry screen (Figure 7).

Figure 7. The Funambol Client Icon as It Appears on My BlackBerry

Click the icon, and you should see a status screen showing Contacts, Calendar, Tasks and Notes, all with Not Synchronized below the labels. To perform a sync, you need to configure the client. Press the menu key on your BlackBerry, and select Settings (Figure 8).

Figure 8. Press the menu key to configure the client settings.

When the Funambol client configuration screen appears (Figure 9), enter the URI for your machine's Funambol server. This is the same address that you entered when you configured the server. You also must enter your user name and password—that's your Linux server user name and password. A little farther down that screen, there are check boxes beside labels to Sync Contacts, Sync Calendar, Sync Tasks and Sync Notes. These are all checked by default, but you may decide you don't want to sync all those resources, so change it here if you like. You also can configure a scheduled sync and have the client update your information every 30 minutes (the default) or whatever period makes sense to you. That feature is not turned on unless you specify otherwise.

Figure 9. Funambol BlackBerry Client's Configuration Screen

When you're done, save your settings (on my BlackBerry, I just press the trackball or the back arrow). You'll find yourself back at the status screen, and now you're ready to synchronize for the first time. Press the menu key, and select Sync All from the menu. The Funambol client will connect with your server and start transferring the information on your BlackBerry. Underneath the labels for Contacts (and Calendar and so on), the client will show how many records are being transferred. Once complete, the status screen lists the last successful sync for each resource (Figure 10).

Figure 10. During synchronization, the status screen shows you the number of records transferred. Once complete, you can see the latest sync at a glance.

This is all wonderful, because the Funambol server effectively is keeping an over-the-air backup of your data—handy if you ever need to reload it. But, what if you use another client on your Linux desktop for e-mail, contacts and appointments, such as Evolution or Thunderbird? Funambol provides download clients for these and others as well. Figure 11 shows a screenshot of a pretty desolate-looking address book in Thunderbird.

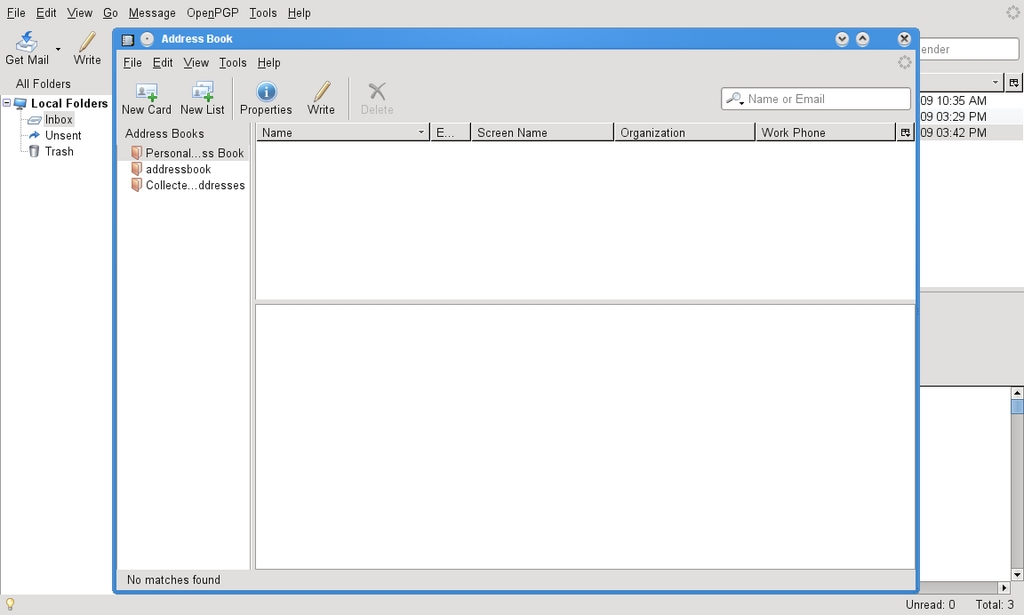
Figure 11. My Thunderbird Address Book, without Any Contacts

The plugin you need for Thunderbird is available from the Funambol community download page. Download it, and save it to a local directory. Once that's done, click Tools on the Thunderbird menu bar and select Add-ons. When the Add-ons window appears, click the Install button, and navigate to the folder where you stored the file, then click on it and install it. Once finished, Thunderbird needs to restart to load the new extension. After Thunderbird restarts, you must configure the Funambol client to connect to your server. Click Tools from the menu bar, and select Funambol plugin. When the Funambol PIM Plugin window appears, click the Options button, and you'll see a screen that, although shinier than the one on the BlackBerry, is similar as it asks for the same information, namely the server URL, user name and password (Figure 12). Enter the information, then click Close.

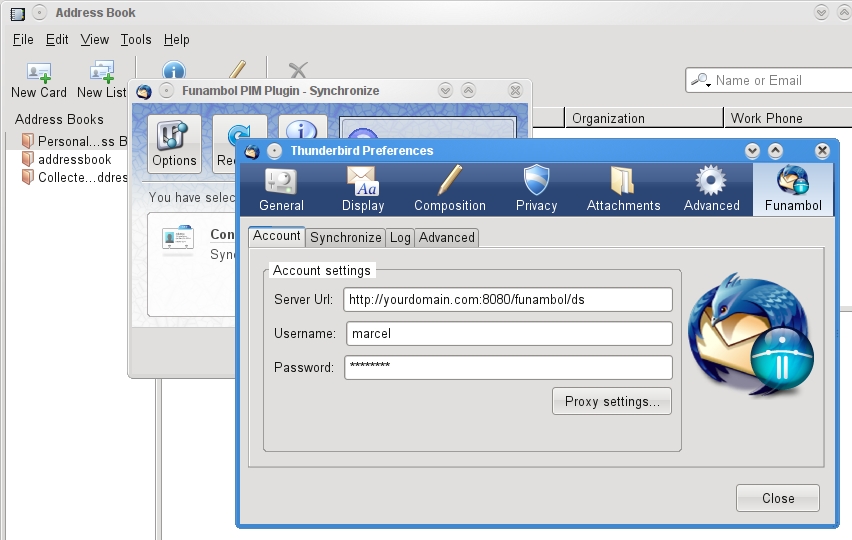
Figure 12. Configuring the Funambol Thunderbird Plugin

That's it. To synchronize Thunderbird with the contacts from my BlackBerry, all I do is click the Synchronize button and wait while my contacts are transferred (Figure 13). How long this takes depends, of course, on how much information is being synchronized and how fast your connection is.

Figure 13. The Thunderbird Sync Plugin Happily Doing What It Is Built to Do

In this way, I can keep my desktop client in sync with my BlackBerry and the server itself. As an added bonus, I get over-the-air backup with my own server without having to shell out the dollars for a BES server. Funambol, Linux and my BlackBerry—it's a match made in open-source heaven.

With the help of Funambol, a great open-source application, you (and François), can keep all that personal information in sync without having to resort to entering the information manually or paying huge sums of money for a special server running proprietary code. Well, mes amis, the time is finally upon us. That old clock on the wall says closing time has arrived yet again. François will be happy to refill your glasses a final time while we say our goodbyes to one another. Please, mes amis, raise your glasses, and let us all drink to one another's health. A votre santé! Bon appétit!

Marcel Gagné is an award-winning writer living in Waterloo, Ontario. He is the author of the Moving to Linux series of books from Addison-Wesley. Marcel is also a pilot, a past Top-40 disc jockey, writes science fiction and fantasy, and folds a mean Origami T-Rex. He can be reached via e-mail atmarcel@marcelgagne.com. You can discover lots of other things (including great Wine links) from his Web sites at marcelgagne.com andcookingwithlinux.com.


Taken From: http://www.linuxjournal.com/article/10486

Creating VPNs - IPSEC and OpenVPN (SSL/TLS)

Creating VPNs with IPsec and SSL/TLS

VPN (Virtual Private Network) is a technology that provides secure communication through an insecure and untrusted network (like the Internet). Usually, it achieves this by authentication, encryption, compression and tunneling. Tunneling is a technique that encapsulates the packet header and data of one protocol inside the payload field of another protocol. This way, an encapsulated packet can traverse through networks it otherwise would not be capable of traversing.


Figure 1. A Basic VPN Tunnel

Currently, the two most common techniques for creating VPNs are IPsec and SSL/TLS. In this article, I describe the features and characteristics of these two techniques and present two short examples of how to create IPsec and SSL/TLS tunnels in Linux and verify that the tunnels started correctly. I also provide a short comparison of these two techniques.

IPsec and Openswan

IPsec (IP security) provides encryption, authentication and compression at the network level. IPsec is actually a suite of protocols, developed by the IETF (Internet Engineering Task Force), which have existed for a long time. The first IPsec protocols were defined in 1995 (RFCs 1825–1829). Later, in 1998, these RFCs were depreciated by RFCs 2401–2412. IPsec implementation in the 2.6 Linux kernel was written by Dave Miller and Alexey Kuznetsov. It handles both IPv4 and IPv6. IPsec operates at layer 3, the network layer, in the OSI seven-layer networking model. IPsec is mandatory in IPv6 and optional in IPv4. To implement IPsec, two new protocols were added: Authentication Header (AH) and Encapsulating Security Payload (ESP). Handshaking and exchanging session keys are done with the Internet Key Exchange (IKE) protocol.

The AH protocol (RFC 2404) has protocol number 51, and it authenticates both the header and payload. The AH protocol does not use encryption, so it is almost never used.

ESP has protocol number 50. It enables us to add a security policy to the packet and encrypt it, though encryption is not mandatory. Encryption is done by the kernel, using the kernel CryptoAPI. When two machines are connected using the ESP protocol, a unique number identifies this connection; this number is called SPI (Security Parameter Index). Each packet that flows between these machines has a Sequence Number (SN), starting with 0. This SN is increased by one for each sent packet. Each packet also has a checksum, which is called the ICV (integrity check value) of the packet. This checksum is calculated using a secret key, which is known only to these two machines.

IPsec has two modes: transport mode and tunnel mode. When creating a VPN, we use tunnel mode. This means each IP packet is fully encapsulated in a newly created IPsec packet. The payload of this newly created IPsec packet is the original IP packet.

Figure 2. An IPsec Tunnel ESP Packet

Figure 2 shows that a new IP header was added at the right, as a result of working with a tunnel, and that an ESP header also was added.

There is a problem when the endpoints (which are sometimes called peers) of the tunnel are behind a NAT (Network Address Translation) device. Using NAT is a method of connecting multiple machines that have an “internal address”, which are not accessible directly to the outside world. These machines access the outside world through a machine that does have an Internet address; the NAT is performed on this machine—usually a gateway.

When the endpoints of the tunnel are behind a NAT, the NAT modifies the contents of the IP packet. As a result, this packet will be rejected by the peer because the signature is wrong. Thus, the IETF issued some RFCs that try to find a solution for this problem. This solution commonly is known as NAT-T or NAT Traversal. NAT-T works by encapsulating IPsec packets in UDP packets, so that these packets will be able to pass through NAT routers without being dropped. RFC 3948, UDP Encapsulation of IPsec ESP Packets, deals with NAT-T (see Resources).

Openswan is an open-source project that provides an implementation of user tools for Linux IPsec. You can create a VPN using Openswan tools (shown in the short example below). The Openswan Project was started in 2003 by former FreeS/WAN developers. FreeS/WAN is the predecessor of Openswan. S/WAN stands for Secure Wide Area Network, which is actually a trademark of RSA. Openswan runs on many different platforms, including x86, x86_64, ia64, MIPS and ARM. It supports kernels 2.0, 2.2, 2.4 and 2.6.

Two IPsec kernel stacks are currently available: KLIPS and NETKEY. The Linux kernel NETKEY code is a rewrite from scratch of the KAME IPsec code. The KAME Project was a group effort of six companies in Japan to provide a free IPv6 and IPsec (for both IPv4 and IPv6) protocol stack implementation for variants of the BSD UNIX computer operating system.

KLIPS is not a part of the Linux kernel. When using KLIPS, you must apply a patch to the kernel to support NAT-T. When using NETKEY, NAT-T support is already inside the kernel, and there is no need to patch the kernel.

When you apply firewall (iptables) rules, KLIPS is the easier case, because with KLIPS, you can identify IPsec traffic, as this traffic goes through ipsecX interfaces. You apply iptables rules to these interfaces in the same way you apply rules to other network interfaces (such as eth0).

When using NETKEY, applying firewall (iptables) rules is much more complex, as the traffic does not flow through ipsecX interfaces; one solution can be marking the packets in the Linux kernel with iptables (with a setmark iptables rule). This mark is a member of the kernel socket buffer structure (struct sk_buff, from the Linux kernel networking code); decryption of the packet does not modify that mark.

Openswan supports Opportunistic Encryption (OE), which enables the creation of IPsec-based VPNs by advertising and fetching public keys from a DNS server.


OpenVPN

OpenVPN is an open-source project founded by James Yonan. It provides a VPN solution based on SSL/TLS. Transport Layer Security (TLS) and its predecessor, Secure Sockets Layer (SSL), are cryptographic protocols that provide secure communications data transfer on the Internet. SSL has been in existence since the early '90s.

The OpenVPN networking model is based on TUN/TAP virtual devices; TUN/TAP is part of the Linux kernel. The first TUN driver in Linux was developed by Maxim Krasnyansky.

OpenVPN installation and configuration is simpler in comparison with IPsec. OpenVPN supports RSA authentication, Diffie-Hellman key agreement, HMAC-SHA1 integrity checks and more. When running in server mode, it supports multiple clients (up tp 128) to connect to a VPN server over the same port. You can set up your own Certificate Authority (CA) and generate certificates and keys for an OpenVPN server and multiple clients.

OpenVPN operates in user-space mode; this makes it easy to port OpenVPN to other operating systems.


Example: Setting Up a VPN Tunnel with IPsec and Openswan

First, download and install the ipsec-tools package and the Openswan package (most distros have these packages).

The VPN tunnel has two participants on its ends, called left and right, and which participant is considered left or right is arbitrary. You have to configure various parameters for these two ends in /etc/ipsec.conf (see man 5 ipsec.conf). The /etc/ipsec.conf file is divided into sections. The conn section contains a connection specification, defining a network connection to be made using IPsec.

An example of a conn section in /etc/ipsec.conf, which defines a tunnel between two nodes on the same LAN, with the left one as 192.168.0.89 and the right one as 192.168.0.92, is as follows:

...
conn linux-to-linux
#
# Simply use raw RSA keys
# After starting openswan, run:
# ipsec showhostkey --left (or --right)
# and fill in the connection similarly
# to the example below.
left=192.168.0.89
leftrsasigkey=0sAQPP...
# The remote user.
#
right=192.168.0.92
rightrsasigkey=0sAQON...
type=tunnel
auto=start
...
You can generate the leftrsasigkey and rightrsasigkey on both participants by running:

ipsec rsasigkey --verbose 2048 > rsa.key
Then, copy and paste the contents of rsa.key into /etc/ipsec.secrets.

In some cases, IPsec clients are roaming clients (with a random IP address). This happens typically when the client is a laptop used from remote locations (such clients are called Roadwarriors). In this case, use the following in ipsec.conf:

right=%any
instead of:

right=ipAddress
The %any keyword is used to specify an unknown IP address.

The type parameter of the connection in this example is tunnel (which is the default). Other types can be transport, signifying host-to-host transport mode; passthrough, signifying that no IPsec processing should be done at all; drop, signifying that packets should be discarded; and reject, signifying that packets should be discarded and a diagnostic ICMP should be returned.

The auto parameter of the connection tells which operation should be done automatically at IPsec startup. For example, auto=start tells it to load and initiate the connection; whereas auto=ignore (which is the default) signifies no automatic startup operation. Other values for the auto parameter can be add, manual or route.

After configuring /etc/ipsec.conf, start the service with:

service ipsec start
You can perform a series of checks to get info about IPsec on your machine by typing ipsec verify. And, output of ipsec verify might look like this:

Checking your system to see if IPsec has installed and started correctly:
Version check and ipsec on-path [OK]
Linux Openswan U2.4.7/K2.6.21-rc7 (netkey)
Checking for IPsec support in kernel [OK]
NETKEY detected, testing for disabled ICMP send_redirects [OK]
NETKEY detected, testing for disabled ICMP accept_redirects [OK]
Checking for RSA private key (/etc/ipsec.d/hostkey.secrets) [OK]
Checking that pluto is running [OK]
Checking for 'ip' command [OK]
Checking for 'iptables' command [OK]
Opportunistic Encryption Support [DISABLED]
You can get information about the tunnel you created by running:

ipsec auto --status
You also can view various low-level IPSec messages in the kernel syslog.

You can test and verify that the packets flowing between the two participants are indeed esp frames by opening an FTP connection (for example), between the two participants and running:

tcpdump -f esp
tcpdump: verbose output suppressed, use -v or -vv for full protocol decode
listening on eth0, link-type EN10MB (Ethernet), capture size 96 bytes
You should see something like this:

IP 192.168.0.92 > 192.168.0.89: ESP(spi=0xd514eed9,seq=0x7)
IP 192.168.0.89 > 192.168.0.92: ESP(spi=0x3a1563b9,seq=0x6)
IP 192.168.0.89 > 192.168.0.92: ESP(spi=0x3a1563b9,seq=0x7)
IP 192.168.0.92 > 192.168.0.89: ESP(spi=0xd514eed9,seq=0x8)
Note that the spi (Security Parameter Index) header is the same for all packets; this is an identifier of the connection.

If you need to support NAT traversal, add nat_traversal=yes in ipsec.conf; nat_traversal=no is the default.

The Linux IPsec stack can work with pluto from Openswan, racoon from the KAME Project (which is included in ipsec-tools) or isakmpd from OpenBSD.

Example: Setting Up a VPN Tunnel with OpenVPN

First, download and install the OpenVPN package (most distros have this package).

Then, create a shared key by doing the following:

openvpn --genkey --secret static.key

You can create this key on the server side or the client side, but you should copy this key to the other side in a secured channel (like SSH, for example). This key is exchanged between client and server when the tunnel is created.

This type of shared key is the simplest key; you also can use CA-based keys. The CA can be on a different machine from the OpenVPN server. The OpenVPN HOWTO provides more details on this (see Resources).

Then, create a server configuration file named server.conf:

dev tun
ifconfig 10.0.0.1 10.0.0.2
secret static.key
comp-lzo
On the client side, create the following configuration file named client.conf:

remote serverIpAddressOrHostName
dev tun
ifconfig 10.0.0.2 10.0.0.1
secret static.key
comp-lzo
Note that the order of IP addresses has changed in the client.conf configuration file.

The comp-lzo directive enables compression on the VPN link.

You can set the mtu of the tunnel by adding the tun-mtu directive. When using Ethernet bridging, you should use dev tap instead of dev tun.

The default port for the tunnel is UDP port 1194 (you can verify this by typing netstat -nl | grep 1194 after starting the tunnel).

Before you start the VPN, make sure that the TUN interface (or TAP interface, in case you use Ethernet bridging) is not firewalled.

Start the vpn on the server by running openvpn server.conf and running openvpn client.conf on the client.

You will get an output like this on the client:

OpenVPN 2.1_rc2 x86_64-redhat-linux-gnu [SSL] [LZO2] [EPOLL] built on
Mar 3 2007
IMPORTANT: OpenVPN's default port number is now 1194, based on an official
port number assignment by IANA. OpenVPN 2.0-beta16 and earlier used 5000
as
the default port.
LZO compression initialized
TUN/TAP device tun0 opened
/sbin/ip link set dev tun0 up mtu 1500
/sbin/ip addr add dev tun0 local 10.0.0.2 peer 10.0.0.1
UDPv4 link local (bound): [undef]:1194
UDPv4 link remote: 192.168.0.89:1194
Peer Connection Initiated with 192.168.0.89:1194
Initialization Sequence Completed
You can verify that the tunnel is up by pinging the server from the client (ping 10.0.0.1 from the client).

The TUN interface emulates a PPP (Point-to-Point) network device and the TAP emulates an Ethernet device. A user-space program can open a TUN device and can read or write to it. You can apply iptables rules to a TUN/TAP virtual device in the same way you would do it to an Ethernet device (such as eth0).

IPsec and OpenVPN—a Short Comparison
IPsec is considered the standard for VPN; many vendors (including Cisco, Nortel, CheckPoint and many more) manufacture devices with built-in IPsec functionalities, which enable them to connect to other IPsec clients.

However, we should be a bit cautious here: different manufacturers may implement IPsec in a noncompatible manner on their devices, which can pose a problem.

OpenVPN is not supported currently by most vendors.

IPsec is much more complex than OpenVPN and involves kernel code; this makes porting IPsec to other operating systems a much heavier task. It is much easier to port OpenVPN to other operating systems than IPsec, because OpenVPN runs entirely in user space and is not involved with kernel code.

Both IPsec and OpenVPN use HMAC (Hash Message Authentication Code) to authenticate packets.

OpenVPN is based on using the OpenSSL library; it can run over UDP (which is the default and preferred protocol) or TCP. As opposed to IPsec, which runs in kernel, it runs in user space, so it is heavier than IPsec in terms of performance.

Configuring and applying firewall (iptables) rules in OpenVPN is usually easier than configuring such rules with Openswan in an IPsec-based tunnel.

Acknowledgement
Thanks to Mr Ken Bantoft for his comments.

Resources

OpenVPN: openvpn.net

OpenVPN 2.0 HOWTO: openvpn.net/howto.html

RFC 3948, UDP Encapsulation of IPsec ESP Packets: tools.ietf.org/html/rfc3948

Openswan: www.openswan.org

The KAME Project: www.kame.net

Rami Rosen is a computer science graduate of Technion, the Israel Institute of Technology, located in Haifa. He works as a Linux and Open Solaris kernel programmer for a networking startup, and he can be reached at ramirose@gmail.com. In his spare time, he likes running, solving cryptic puzzles and helping everyone he knows move to this wonderful operating system, Linux.

Wednesday, September 23, 2009

PPPoE and DSL Connections - Public IP

The Point-to-Point Protocol over Ethernet (PPPoE) is a network protocol for encapsulating Point-to-Point Protocol (PPP) frames inside Ethernet frames. It is used mainly with DSL services where individual users connect to the DSL modem over Ethernet and in plain Metro Ethernet networks. It was developed by UUNET, Redback Networks, and RouterWare and is available as an informational RFC 2516.


Figure 1 (click to enlarge)

Imagine that you have the scenario on Figure 1 where you have DSL Router/Bridge (ISR - Thomson st516 v6), where one interface connects to a Router / Firewall on your private network, and the other to your ISP, wher this one has the Public IP provided by your ISP.

Now imagine that the Router / Firewall has the ability to make VPNs. And you want make one, but you have a problem, you don't have a Public IP on the interface you want to end the VPN. This is where PPPoE, migth be usefull. Instead off starting the PPPoE conection from the DSL Router/Bridge (ISR), you start it from you Router / Firewall, in order for it to get the public IP from the ISP on it's interface. For this on the DSL Router/Bridge (ISR), you need to change the mode from Router to Bridge and input the your ISP's ATM VPI/VCI, in order to make this a pass through only device. And off course configure the PPPoE connection on your Router / Firewall, with you account data (login and username) and your IPS's ATM VPI/VCI. Now your Router / Firewall has an Public Ip and now you can configure your VPN service.


Figure 2 (click to enlarge)

The same applyes, to the scenario on Figure 3, where instead off a Router / Firewall you have a computer running Windows or Linux, that has for example a Web Server, that needs to be accessible from the internet an for that you need a Public Ip, on it's interface. Don' t forget that on DSL Router/Bridge (ISR), you need to change the mode from Router to Bridge and input the your ISP's ATM VPI/VCI, in order to make it a pass through only


Figure 3 (click to enlarge)


Configuring PPPoE on Windows

You can install the PPPoE client just like you install any other dial-up networking connection. To create a PPPoE client connection, follow these steps:

1. Click Start, click Control Panel, and then double-click Network and Internet Connections.
2. Click Network Connections, and then click Create a new connection in the Network Tasks pane.
3. After the Network Connection Wizard starts, click Next.
4. Click Connect to the Internet, and then click Next.
5. Click Set up my connection manually, and then click Next.
6. Click either Connect using a broadband connection that requires a user name and password or Connect using a broadband connection that is always on.
7. Type the Internet service provider (ISP) name that your ISP provided, and then clickNext.
8. Type the user name that the ISP provided.
9. Type the password that the ISP provided.
10. Type the password one more time to confirm it, and then click Next.
11. Click Add a shortcut to this connection to my desktop.
12. Click Finish to complete the wizard.


Configuring PPPoE on Linux

=======================================
ALL DEVICES FOUND?
I found 3 ethernet devices:
eth0
pan0
wlan0
Are all your ethernet interfaces listed above? (If No, modconf will be started so you can load the card drivers manually
Yes

=======================================
Most people using popular dialup providers prefer the options 'noauth' and 'defaultroute' in their configuration and remove the 'nodetach' option. Should I check your configuration file and change these settings where neccessary?

Yes


=======================================
Please enter the username which you usually need for the PPP login to your provider in the input box below. If you wish to see the help screen, delete the username and press OK.
username________________________________________________

your_username

=======================================
Please enter the password which you usually need for the PPP login to your provider in the input box below. NOTE: you can see the password in plain text while typing.

your_password

=======================================
You need at least one DNS IP address to resolve the normal host names. Normally your provider sends addresses of useable servers when the connection is established. Would you like to add these addresses automatically to the list of nameservers in your /etc/resolv.conf file? (recommended)

Yes

=======================================
Many providers have routers that do not support TCP packets with a MSS higher than 1460. Usually, outgoing packets have this when they go through one real Ethernet link with the default MTU size (1500). Unfortunately, if you are forwarding packets from other hosts (i.e. doing masquerading) the MSS may be increased depending on the packet size and the route to the client hosts, so your client machines won't be able to connect to some sitesThere is a solution: the maximum MSS can be limited by pppoe. You can find more details about this issue in the documentation. Should pppoe clamp MSS at 1452 bytes? If unsure, say yes (If you still get problems described above, try setting to 1412

Yes

=======================================
Your PPPD is configured now. Would you like to start the connection at boot time?

Yes

=======================================
Now, you can make a DSL connection with "pon dsl-provider" and terminate it with "poff". Would you like to start the connection now

Yes

=======================================
The DSL connection has been triggered. You can use the "plog" command to see the status or "ifconfig ppp0" for general interface info.

OK


Based on:

Remote Desktop (XDMCP) on Ubuntu

Here I'm going to show you howto activate XDMCP (remote desktop protocol), on Gnome (bash an gui) and KDE. I have tested it only on Gnome so far. Note that this remote desktop protocol does not forwand sound.

Here some notes on the roles of the XDMCP server and client

Server - The remote machine were we want to login.
Client - The local machine were we will login on the Server

Before trying anything on XDMCP, you should make
sure that on the server your firewall is either disabled
or allows Udp port 177.

Here I'm going to show how to open a UDP 177 (rule),
on Iptables (firewall) using the bash, but you use a
very simple and usefull, Gui for Iptables nown as
"Firestarter" (to install on ubuntu just do
sudo apt-get install iptables).

$ sudo iptables -A INBOUND -p udp --destination-port 177 -j ACCEPT

Here are a couple off other usefull comands on Iptables

## Checking Iptables Rules #####
$ sudo iptables -nvL

if you have already executed the rule to open UDP port 177,
by executing this comand, you should see it there.

## Clearing All the Rules #####
$ sudo iptables -F

be aware that this comand clears all off the rules, and this
does not mean that all is allowed, on the contrary,
IPtables default beaviour, when it has no rules is to
deny all, so be very carefull.


XDMCP GNOME - via Bash
=====================================

XDMCP Server Configuration
----------------------------------

## Allowing the remote login on the Server #####
$ sudo gedit /etc/gdm/gdm.conf-custom
...
[xdmcp]
Enable=true
...

You should have the above on the file.

If you want the remote login screen to be the same as
the graphical greeter that is the default in the Ubuntu
install make sure that the following is present.

...
[daemon]
RemoteGreeter=/usr/lib/gdm/gdmgreeter
...

For these changes to take efect you can either,
reboot:

$ sudo reboot

or restart the service, for that go to text terminal (Ctlr+Alt+F2)
and type:

$ sudo /etc/init.d/gdm restart

to go back to you Gnome environment try Ctlr+Alt+F7, or some
Ctlr+Alt+Fx, close to F7.


XDMCP Client Login
------------------------

$ sudo X :1 -query server_ip

After this if all went well you should see
Ubuntu's graphical login screen, as if you
were on the remote computer fisicaly.

If don't want to see it fullscreen, you can
show the remote desktop on a window by
using the following command instead:

$ sudo Xnest :1 -query server_ip


XDMCP GNOME - via Gui
=====================================

This is equivelent to the shown above, the diference
is that, the server here is configured via Gui.

XDMCP Server Configuration
-----------------------------------
Allowing the remote login on the Server


As shown above System > Administration > Login Window


And then change the Style to "Same as Local", and that's it.
Aditional confuguration can be done on "Configure XDMCP"

For these changes to take efect you can either,
reboot:

$ sudo reboot

or restart the service, for that go to text terminal (Ctlr+Alt+F2)
and type

$ sudo /etc/init.d/gdm restart

to go back to you Gnome environment try Ctlr+Alt+F7, or some
Ctlr+Alt+Fx, close to F7.


XDMCP Client Login
------------------------

$ sudo X :1 -query server_ip

After this if all went well you should see
Ubuntu's graphical login screen, as if you
were on the remote computer fisicaly.

If don't want to see it fullscreen, you can
show the remote desktop on a window
by using the following command instead:

$ sudo Xnest :1 -query server_ip


XDMCP KDE - via Bash
(didn't test it, give me feedback if you do)
=====================================

XDMCP Server Configuration
----------------------------------
Still working on it...

XDMCP Client Login
------------------------

$ sudo X :1 -query server_ip

After this if all went well you should see
Ubuntu's graphical login screen, as if you
were on the remote computer fisicaly.

If don't want to see it fullscreen, you can
show the remote desktop on a window
by using the following command instead:

$ sudo Xnest :1 -query server_ip

Based On:

GNOME
http://megaf.wordpress.com/2009/04/15/xdmcp-internet-seu-linux-onde-voce-estiver/
http://stochasticflux.com/blog/?p=4

KDE

http://www.guiadohardware.net/tutoriais/configurando-servidor-xdmcp/pagina3.html
http://megaf.wordpress.com/2009/04/15/xdmcp-internet-seu-linux-onde-voce-estiver/

Iptables
http://www.cyberciti.biz/tips/linux-iptables-open-bittorrent-tcp-ports-6881-to-6889.html

Saturday, September 19, 2009

Remote Applications via X11 - Easy Way (over ssh)

Here I will show you how to interact with applications remotely. This is quite useful when you have for example an Ubuntu Server that doesn't have a graphical environment (Gnome or KDE) and a Desktop that has and you need to use some graphical applications on the Ubuntu Server but you can't because you don't have a graphical environment.

So whit this you can show and interact with the graphical applications on the Ubuntu Server, using your Desktop's, graphical environment. So in the X11 world you have the following:

Ubuntu Server - X11 Client --> Application is executed
Ubuntu Desktop - X11 Server --> Application is shown

It's a bit confusing at first, that your Ubuntu Server is your X11 Client, and you Desktop is the X11 Server.

Note: this was tested on Ubuntu 8.04 and 9.04.

X11 Server - Where the remote apps will be shown
===================================

my_user@my_desktop:~$ ssh -X root@remote_server
root@remote_server:~$

Now you have a what looks like a normal ssh remote terminal on the "remote_server". But when you execute an graphical apps on the remote server it will be displayed on your desktop, for example:

root@remote_server:~$ gedit

With this you can make a text file on your machine tha will be saved on the remote server.

If you want ssh to always act like this, have the following line in your /etc/ssh/ssh_config:

ForwardX11 yes

With this method all the data over the network will be encrypted, because of ssh, but if you want to kick it old school, whit no encryption an a lot more complicated using X11 directly, you can check the post "Run Applications Remotely via X11 - Hard Way"

Based on: http://wiki.linuxquestions.org/wiki/X11_forwarding_with_OpenSSH

Remote Applications via X11 - Hard Way

Here I will show you how to interact with applications remotely. This is quite useful when you have for example an Ubuntu Server that doesn't have a graphical environment (Gnome or KDE) and a Desktop that has and you need to use some graphical applications on the Ubuntu Server but you cant because you don't have a graphical environment.

So whit this you can show and interact with the graphical applications on the Ubuntu Server, using your Desktop's, graphical environment. So in the X11 world you have the following:

Ubuntu Server - X11 Client --> Application is executed
Ubuntu Desktop - X11 Server --> Application is shown

It's a bit confusing at first, that your Ubuntu Server is you X11 Client, and you Desktop is the X11 Server.

Note: this was tested on Ubuntu 8.04 and 9.04.

X Server - 192.168.1.68 (Where the remote apps will be shown)
=======================================
## Allow that the remote applicatilõns to be show on the X11 Server #####
$ sudo gedit /etc/gdm/gdm.conf

DisallowTCP=true
change it to
DisallowTCP=false


## Reboot to load the new gdm.conf file #####
$ sudo reboot


## Check if the X Server TCP Connections ######
$ netstat -natp |grep :6000

(Not all processes could be identified, non-owned process info
will not be shown, you would have to be root to see it all.)
tcp 0 0 0.0.0.0:6000 0.0.0.0:* LISTEN -
tcp6 0 0 :::6000 :::* LISTEN -


## Add permission for the remote X Client applications #####
## to be shown locally this is temporary, when you #####
## reboot, you must do this again #####
$ sudo xhost 192.168.1.71

## Find the id of the display you are in currently, #####
## and were we see the remote apps, from the X Clinet #####
$ echo $DISPLAY
:0.0


X client - 192.168.1.71 (Where the remote apps will be executed)
========================================

In order to show an application remotely you should use one of the options bellow, where 192.168.1.68 is the IP of the remote computer were the applications will be shown and 0.0 is the id of the graphical terminal on that computer, found earlier, were the remote applications will be displayed.

In this example we execute the application "nautilus", you should change it to the application you want to see remotely.
$ sudo DISPLAY=192.168.1.68:0.0 nautilus
or
$ sudo export DISPLAY=192.168.1.68:0.0
$ nautilus

some applications will not work with the first option so try the second.

After executing one of the two options above, the applications
will be running locally on the X Client (192.168.1.71) but displayed remotely on X Server (192.168.1.68), the applications will not be able to see or use anything on the X Server, there you can only interact with it, and all the resources it may use are from the X Client (local machine).

For example if you replace "nautilus" with "gedit", write something on it and save it the file will be saved on the X Client and not on the X Server were you are interacting with it.


With this method all the data over the network will not be encrypted, if you want a method with encription and a lot easyer using X11 over ssh, you can check the post "Run Applications Remotely via X11 - Easy Way (over ssh)"


Inspired on:

http://ubuntuforums.org/showthread.php?t=162566
http://www.cisl.ucar.edu/docs/ssh/guide/node29.html
http://www.hackinglinuxexposed.com/articles/20040513.html
http://www.linuxquestions.org/questions/linux-newbie-8/how-do-i-restart-x-without-rebooting-418785/
http://www.linuxplanet.com/linuxplanet/tutorials/857/3/
http://www.codingdomain.com/linux/remote/x11/

Wednesday, September 2, 2009

NIC Auto-Negotiation and Duplex Settings - NIC satus

FAQ: How to change Duplex and/or Auto-Negotiation NIC settings in Linux?

Q: How to disable auto-negotiation option of my network interface card and set up half/full duplex mode manually from Linux command line (CLI)? By the way, how to see current settings?
A: There are several Linux utilities coming with almost any distribution including Debian, Ubuntu, Fedora, RedHat, Mandriva, Centos whatever. See details below.

auto-nego

ethtool

This is rather powerful utility can display and change settings of ethernet network interface card. You can easily disable/enable autonegotiation option for your NIC, also it’s possible to manually set up duplex mode, configure wake-on-lan options, set speed settings. Just look through full manual page for ethtool. Here are several ethtool usage examples:

ethtool eth0 - shows current NIC settings

Settings for eth0:
Supported ports: [ TP MII ]
Supported link modes: 10baseT/Half 10baseT/Full
100baseT/Half 100baseT/Full
Supports auto-negotiation: Yes
Advertised link modes: 10baseT/Half 10baseT/Full
100baseT/Half 100baseT/Full
Advertised auto-negotiation: No
Speed: 10Mb/s
Duplex: Half
Port: MII
PHYAD: 32
Transceiver: internal
Auto-negotiation: off
Supports Wake-on: pumbg
Wake-on: d
Current message level: 0x00000007 (7)
Link detected: yes

ethtool -s eth0 duplex half autoneg off - disables auto-negotiation, enables Half Duplex.
ethtool -s eth1 duplex full speed 1000 autoneg off - disables auto-negotiation, enables Falf Duplex and sets up Speed to 1000 Mb/s.

mii-tool

According to manual it allows to manipulate and see media-independent interface status. Let’s see examples:

bash-3.1# mii-tool eth0
eth0: negotiated 100baseTx-FD, link ok
- shows 100 Mbps speed, Full Duplex, Auto-negotiation is on.
bash-3.1# mii-tool eth0 -F 10baseT-HD - enables 10 Mb/s Half Duplex connection.


Taken From: http://www.linuxscrew.com/2008/11/20/faq-how-to-change-duplex-andor-auto-negotiation-nic-settings-in-linux/